On my last post I've setup an asp.net core project which outputs simple maps tiles dynamically generated using the ImageProcessor library (which now supports .NET Core).
As I've mentioned that lib doesn't yet include drawing functionality, so on this post I'll try to address that as a pre-requisite to being able to draw proper map tiles. For now I'll focus on drawing lines, including support for variable width and anti-aliasing, doing some benchmarking along the way to make sure that the performance is adequate.
By-the-way, since my first post the proper 1.0 release has been launched, so I'm also updating the code to reflect the latest bits :)
Lots of stuff to do so let's get started:
1. Drawing simple lines
For drawing lines I've used Bresenham's line algorithm. It's really simple to implement and provides accurate and fast results. The implementation (for all 4 quadrants) is:
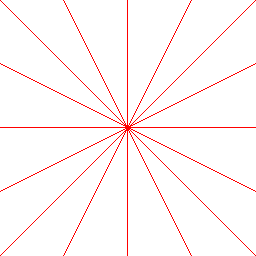
void DrawLine(Image image, int x1, int y1, int x2, int y2, Color color)I'm drawing the following lines with it:
{
int w = x2 - x1;
int h = y2 - y1;
int dx1 = 0, dy1 = 0, dx2 = 0, dy2 = 0;
if (w < 0) dx1 = -1; else if (w > 0) dx1 = 1;
if (h < 0) dy1 = -1; else if (h > 0) dy1 = 1;
if (w < 0) dx2 = -1; else if (w > 0) dx2 = 1;
int longest = Math.Abs(w);
int shortest = Math.Abs(h);
if (!(longest > shortest))
{
longest = Math.Abs(h);
shortest = Math.Abs(w);
if (h < 0) dy2 = -1; else if (h > 0) dy2 = 1;
dx2 = 0;
}
int numerator = longest >> 1;
for (int i = 0; i <= longest; i++)
{
image.SetPixel(x1, y1, color);
numerator += shortest;
if (!(numerator < longest))
{
numerator -= longest;
x1 += dx1;
y1 += dy1;
}
else
{
x1 += dx2;
y1 += dy2;
}
}
}
_lineDrawing.DrawLine(image, 0, 0, 255, 255, Color.Red);The end-result is this:
_lineDrawing.DrawLine(image, 0, 255, 255, 0, Color.Red);
_lineDrawing.DrawLine(image, 0, 63, 255, 191, Color.Red);
_lineDrawing.DrawLine(image, 0, 191, 255, 63, Color.Red);
_lineDrawing.DrawLine(image, 0, 127, 255, 127, Color.Red);
_lineDrawing.DrawLine(image, 127, 0, 127, 255, Color.Red);
_lineDrawing.DrawLine(image, 63, 0, 191, 255, Color.Red);
_lineDrawing.DrawLine(image, 191, 0, 63, 255, Color.Red);
2. Adding thickness to the line
This was actually trickier than I had anticipated. I had two different approaches to this:
First approach:
- Drawing a regular simple line
- For each point create 2 perpendicular lines (one for each direction) a draw it up to a certain distance
- Calculate the perpendicular points at the start and end of the line
- Draw various parallel lines to the main one, until achieving a certain width.
Unfortunately there was a problem I hadn't anticipated. When drawing parallel lines it's possible that you end up with spaces between them if the perpendicular (normal) points represent both an horizontal and vertical step.

To solve this I've changed the drawing logic to pick the points on the normal without doing any diagonals. I've actually used a modified Bresenham's algorithm for this. The end-result is conceptually like this:

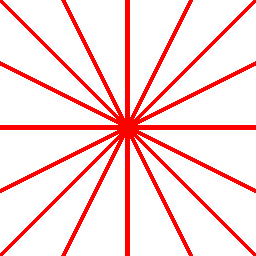
Applying this logic to the previous star pattern with a width of 5:
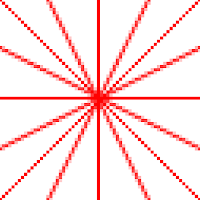
Unfortunately, when zooming in we can see it's quite pixelated (aliased).
 |
| Original (zoomed) |
3. Adding anti-aliasing support
I also have two different approaches to solve this problems:
First approach:
- When drawing the parallel lines use a different algorithm to draw the ones on both edges with a line algorithm that supports anti-aliasing, such as Xiaolin Wu's
Second approach:
- Draw everything on an higher resolution and then scale the image down.
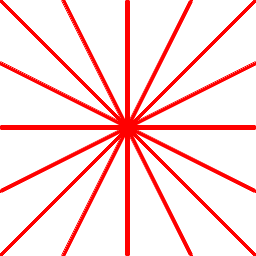
Went with approach two (scale down) and this is the end-result:
 |
| Downscalling (zoomed) |
So, back to the drawing board (ah!) to try the other approach: supporting anti-aliasing on the line drawing algorithm itself, using Xiaolin Wu's line algorithm:
 |
| Bresenham's line (zoomed) |
 |
| Xiaolin Wu's line (zoomed) |
The implementation is slightly more complex than Bresenham, but its performance is pretty reasonable.
For the full implementation please check my github repo.
On the top images you can see how it compares with Bresenham algorithm, providing a subtle anti-aliasing.
So, to support anti-aliased lines with variable widths I'm going to:
- Use the first strategy I've shown do draw multiple parallel lines to achieve a thick line
- Drawing the lines furthest away from the main line using Xiaolin Wu's line algorithm
- Drawing all the other lines with Bresenham's line algorithm
 |
| Mixing Bresenham and Xiaolin Wu (zoomed) |
 | |
| Mixing Bresenham and Xiaolin Wu (original size) |
Also, in order to properly support transparent pixels I had to include a proper color blending routine. Otherwise, when setting a semi-transparent pixel on top of an existing color it would replace it altogether.
Thus, in these cases I've just added the following code:
public static Color BlendColor(Color bg, Color fg)
{
    var r = new Color();

    r.A = 1 - (1 - fg.A) * (1 - bg.A);
    if (r.A < 1.0e-6) return r; // Fully transparent -- R,G,B not important
    r.R = fg.R * fg.A / r.A + bg.R * bg.A * (1 - fg.A) / r.A;
    r.G = fg.G * fg.A / r.A + bg.G * bg.A * (1 - fg.A) / r.A;
    r.B = fg.B * fg.A / r.A + bg.B * bg.A * (1 - fg.A) / r.A;

    return r;
}
This tile gives an actual funky effect on top of a map

4. Drawing hexagons
Now that I've got a reasonable toolset I'm able to create the hexagon tiles layer to overlay on the map. I'm not going to post all the relevant code here so feel free the take a look at the source-code on the corresponding github repo.
The end-result is far from astonishing but shows the effect I was going for.
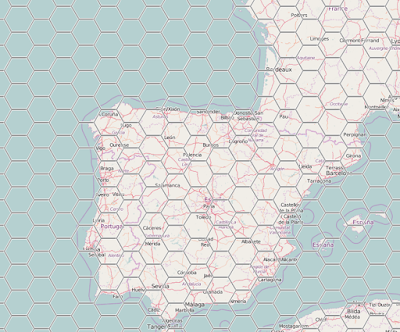 |
| zoom level 6 |
 |
| zoom level 8 |
This was a fun experiment but I expect it to get obsolete in the short-term, particularly as soon as Microsoft includes proper drawing methods in System.Drawing. Thus I'm not planning in taking it any further. Regardless, I might reuse some of these bits on other stuff.
The complete code can be viewed at: https://github.com/pmcxs/CoreTiles