Quantcast
Channel: Pedro's Tech Mumblings
Viewing all 63 articles
Browse latest View live

Maps and Boardgames (Part 2 - Using server tiles)

$
0
0

In my previous post I've created an hexagon layer in client-side using HTML5 Canvas. In this post I'm going to generate the hexagons on the server and display them on a map. So, the roadmap for this post will be:
  • Generate the hexagons  in C#
  • Store them as spatial data in SQL Server 2008 using NHibernate Spatial
  • Use QuantumGIS (or any other GIS tool for that mater) to read that data and tweak it 
  • Use Tilemill to generate a layer of .mbtiles, including UTFGrid data of the hexagons
  • Extract the .mbtiles file to image files
  • Use the data on a Leaflet map.
  • Create some basic interaction on the map


    If you want you can skip to the end result.

    Now, we've got two options for this. We can create hexagons that overlay perfectly on top of the map, all of them having the same pixel size, or all have the same edge size in meters, regardless of where they are on the world.


    This is a particularly interesting decision because it will have a great deal of impact on how the hexagons are displayed. Why? Because, as with any planar projection, some distortion occurs. Google/Bing/Leaflet use a projection popularly called as "Web Mercator", and a world map looks like this (taken from OpenStreetMaps):

    Look at the bottom of the map. It's easy to see that the poles are stretched. So, a 20 pixel hexagon on the bottom would map to a real distance pretty much different from an hexagon on the center of the map with the same pixel size.

    But, if we want edges with real-distance parity, the hexagons will be displayed distorted on the map. So, decisions, decisions, we've got to choose. So, to summon up, we can:
    • Have a geographical correct hexagon which has all sides with the same geographic distance (in meters) that looks distorted on the map.
    or
    • Have a geographical incorrect hexagon that looks nice on Web Mercator maps.

    I'm a hands-on person, so I've implemented both. Then I'll choose one of the approaches and stick with it for the remainder of the post.


    Implementation 1 - geographical correct, distorted on the map

    The algorithm will be pretty simple. Start with a coordinate and then, knowing the bearing (angle from the North - counter-clockwise) and the distance (edge size in meters) determine the target point. Do this for all the points of the hexagon. Repeat the process for each hexagon.

    The bearing is easy to find. Knowing that, in a regular hexagon, the inside angles are all 120º, I've drawn this piece of art.

    The displayed angles correspond to the bearing. I've included a solution with all the source code where you might check the algorithm.

    After running the program we've got a bunch of hexagons in the database, stored in a geography column. SQL Server Management studio allows us to show the data according to several projections, one of them being Mercator.


    So, choosing Mercator, this is what we get:


    This is what would appear on top of the Leaflet map. It's kind-of interesting, and from a gameplay point-of-view is more fair to the players because the hexagons have the same geographic area (as opposed to pixel area). Looks a little bit strange though.

    Let's check the other alternative.

    Implementation 2 - geographical incorrect, aligned on the map

    I'm not going to bother you with all the details, but the algorithm will basically work with on a planar web mercator projection in pixels to create the hexagons, and convert each point to the corresponding geographic coordinates. I've used the algorithms explained here to go from pixel coordinates to lat/lon.

    After running the program and choosing the Mercator projection, our query in SQL Management Studio shows this:


    Pretty nice. Every hexagon of the same pixel size and all lined-up.

    Now, although the first option was more groovy, I think I'll opt for this one to display on the map.
    So, and for the remainder of this post, you may safely forget the first option.


    Now that we have some data to work with we'll enrich it a little bit. I just want the hexagons that are placed on top of Europe so I'm going to cook it with a shapefile of the world-countries. A simple "shapefile world" search on Google brought me to this url,where I've download the file named: TM_WORLD_BORDERS-0.3.zip.

    There are several ways to get the data out of SQL Server. I recommend using Quantum GIS (QGIS). It's free, powerful, what's not to like?

    The problem is that the current stable version doesn't support SQL Server 2008 natively. I've downloaded the latest one (1.9.90-Alpha) using the OSGeo4W distribution which brings SQL Server native support.

    Anyway, after firing up QGIS let's add the downloaded worldmap shapefile.


    Afterwards, use the new "Add MSSQL Spatial Layer" button.


    Select the table/column to import and add the result to the current project.


    Now, let's do something cool. Let's merge the attributes of the world map that we downloaded to the hexagons and clip the hexagons that don't match with any country terrain, i,e, water .


    Name the new file "intersection.shp".

    When asked accept to add the layer to the TOC.

    Hide the hexagon layer.

    The displayed result should be something like this:

    Now, using ogr2ogr2 or QuantumGis (version 1.6.0 or less), you should reproject the data to the SRID 900913.

    Now, using TileMill I'm going to create the base tiles. I'll copy the base map of one of TileMill example projects: "Geography Class". Also, add some cosmetic effect on the hexagons.

    The end result should be this (still inside TileMill).


    I've created a version with and another without the hexagons.

    Now, let's export the mbtiles. If necessary follow the instructions in one of my previous posts.

    I've created the following page:


    Drag the helicopters from hex to hex and it will snap to its center.

    You can try the demo page here


    Go to Part 3

    Maps and Boardgames (Part 3 - Client Side drawing + Optimizing)

    $
    0
    0

    In my previous post I've shown how one may interact with an hexagon layer on top of a Leaflet map.  The particular thing in that example is that it used hexagons embedded in the server-side tile images (created using TileMill). This has some pros and cons:

    Pros:
    - great performance
    - works on most browsers (even pre-HTML5)
    - less "visual noise", as the map is rendered at the same time as the hexagons (heck, they're in the same image tiles)

    Cons:
    - by itself it's difficult to have client-side behavior. It's possible using something like the UTFGrid technology, but that brings some additional complexity to the table and some limitations (I've used this approach in my previous post).
    - the hexagons are static. So, if for example, we want to generate the hexagons with a different size or color or change them dynamically we're kind of screwed.

    In this post I'm going to try a different approach, and return to the HTML5 Canvas implementation that I've started in the first post of this series.

    I'll start by creating a sort-of similar example to the one in my previous post:
    • As I've said in my previous post, I've generated a set of tiles with and without the hexagons. The one without was already anticipating this post (+1 for thinking ahead for once).
    • Create a matrix of hexagons in Javascript (just the coordinates without drawing)
    • Paint the hexagons using Leaflet's Canvas Layer and HTML5.
    This is the end result. Check the demo here.


    It works nicely, and I've tweaked the Canvas code so that the hexagons provide the same cosmetic feeling as before, including the white border, the transparency, etc.


    Now to add some basic interaction to it. Let's detect the hexagon that is clicked and change its color. The interesting thing here is the click-detection, because we've got to handle the click event on the map and translate it to a specific hexagon by doing some math.

    Result below. Demo here.


    Now, the problem with the "Canvas Layer" approach is that it doesn't feel as "snappy" as the one with the server-side tiles. It generates the hexagons fast enough, but has a very small delay that is bothering me.

    I'm going to try and isolate this issue on a basic prototype. I've created a very simple page which outputs the following image using Html5 Canvas. You can try a working example here.


    100+ milliseconds to draw all these hexagons is not that bad, but it's not negligible by the user. Knowing that we want to pan and zoom the hexagons I would like something below 40-50 ms for each tile.

    So, I thought a little bit on the subject and had an epiphany while showering (true story) :P

    The hexagons create repeatable patterns. One of the patterns is:


    The yellow rectangle contains a pattern that is repeated on the red rectangles. It repeats the hexagons seamlessly.

    So, if we can recreate that pattern, we can use the Canvas pattern feature and paint the full canvas with it. The procedure will thus be:
    • Create a very small canvas with the pattern
    • Create a very small pattern from the previous canvas
    • Use the pattern to paint the large canvas   
    I've created a new page following these steps that should display the same output as before, but faster. Check it here.


    As you can see the displayed image is exactly like the previous one. The main difference: 3 ms vs 111 ms !!! (obviously may vary per computer/browser). IMHO that was blazing fast to render, and I'm including the time it takes to create the pattern.

    Applying this technique to a map is not straightforward though, and for now I don't think the gain is enough to justify implementing it (if time permits I'll do it eventually).
     
    Much more could be said about Maps and Boardgames, but I've got some other stuff in my "stack" that I would like to talk about, so I'll wrap up this topic with this post.


    Update 16/11/2012

    Well, I've received a comment with a better implementation for my first drawing approach. The change seems minor but was enough to drop the time from about 100ms to less than 10ms. You can check the updated example here. Thanks sado


    Entity Framework 5 and Spatial Data (Part 1 - Introduction)

    $
    0
    0

    I've blogged a lot on NHibernate Spatial. Although it works nicely, it seems to have been left for dead. It no longer compiles without modifying the source code and has many missing features and bugs.

    On the other hand, Entity Framework is finally receiving native Spatial Support on version 5 (it's about time). Although it still is in Beta 2, I believe it's time to check it out and to see how it fancies itself. I'm going to create an example using it against a SQL Server database.

    I'm going to use the following model:
    • There are 18 districts, each defined by a polygon
    • The are about 140.000 places, each defined by a geographic point
    I've already used this model on a previous blog post.

    I'll create two separate projects:
    • Class library with the model
    • Console application with some spatial operations

    Step 1. Install the Software Requirements
    • Visual Studio 11 Beta
    Could I build this example in VS 2008/2010? Actually no... It seems that the Beta 2 only includes spatial support for .NET 4.5. Anyway, as I'm just testing this, no big deal. Let's install the sucker.


    • SQL Server 2008 or 2012
    For this example I'll assume that the SQL Server is a non-named instance on the development machine. If that's not your case just change the connection string accordingly. It works with both SQL 2008 and 2012, although spatial support has evolved a lot in SQL Server 2012.

    Step 2. Create a class library for the Model
    • Create a new class library named "SpatialDemo.Model"

    • Use NuGet to install the EntityFramework Beta. Thus, open the "Package Manager Console" and type:
    install-package EntityFramework -Pre

    Step 3. Create the Model
    • Add a new "ADO.NET Entity Data Model" item to the project. Name it "MainModel.edmx". The name of the model is important because the Entity Framework will determine the correct connection string based on this name.
    • As I already have the database created, I'll generate the Entity Framework model from the database.
    • Fill the connection properties. In my case the server is just "." or "(local)" and the database is "SpatialDemo".
    • Choose the tables. I'll import both and name the namespace as "SpatialDemoModel".
    • The created model should look like this:
    • Now I could just use the classes that are generated from the model. I could, but I won't, so let's clear the "Custom Tool" property of the Model.
    • I prefer to have my domain classes persistence ignorant. Thus, I'll use some Templates provided for  Entity Framework 5 to achieve this. They're in the "online" section. Choose the one named "EF 5.x DbContext Generator for C#". Name it "MainModel.tt".
    • Two files are added to the project:
      • MainModel.tt
      • MainModel.Context.tt
    • Before the templates can generate any code we have to replace the model name inside them. So, replace the token with: "MainModel.edmx".
    • Afterwards, save both files so the source-code generation is triggered.

    • Now, let's create a console application to test it. Name it "SpatialDemo.Console" and add a reference back to "SpatialDemo.Model".


    Step 4. Query.
    • The console application will:
      • Load all districts and check that the spatial data is there
      • Load the district that contains a specific point
      • Loads the 10 places that are nearest to a specific point
    The complete source-code is:
    using System.Data.Spatial;
    using System.Linq;

    namespace SpatialDemo.Console
    {
    class Program
    {
    static void Main()
    {
    using (var db = new Model.SpatialDemo())
    {

    //1. Load all districts
    var districts = db
    .District
    .ToList();

    foreach(var district in districts)
    {
    System.Console.WriteLine("District {0}. Spatial Type: {1}",
    district.Name,
    district.Area.SpatialTypeName);
    }

    //2. Load the district that contains a specific point
    DbGeography point = DbGeography.FromText("POINT (-8.5 38)", 4326);

    var matchingDistrict = db.District
    .SingleOrDefault(d => d.Area.Intersects(point));

    if (matchingDistrict == null)
    {
    System.Console.WriteLine("No district found ");
    }
    else
    {
    System.Console.WriteLine("Match: {0}", matchingDistrict.Name);
    }

    //3. Get the first 10 places nearest to a specific point
    var nearestPlaces = db.Place
    .OrderBy(p => p.Location.Distance(point))
    .Take(10)
    .ToList();

    foreach (var place in nearestPlaces)
    {
    System.Console.WriteLine("Place {0}", place.Name);
    }

    }
    }
    }
    }
    I'm impressed with the easiness of all this... really impressed. But there's some caveats to this approach and in my next post I'm going to make a full "NHibernate Spatial" VS "Entity Framework 5".

    Go to Part 2

    Entity Framework 5 and Spatial Data (Part 2 - Comparison with NHibernate Spatial)

    $
    0
    0
    Part 1 - Introduction
    Part 2 - Comparison with NHibernate Spatial

    As promised in my previous post I'm going to do a comparison between NHibernate Spatial and Entity Framework.
     
    I'll start by making a pros/cons list for both libraries, but just focusing on items that may differ between them.

     NHibernate Spatial

    Pros:
    • True abstraction from the database with IGeoAPI/NetTopologySuite
    • Works with .NET 3.5 and newer
    Cons:
    • No longer actively developed
    • Querying with LINQ/QueryOver doesn't work in many cases
    • Some spatial operators are not implemented


    Entity Framework 5 Beta 2 Spatial

    Pros:
    • Setup is a breeze
    • Querying with LINQ works flawlessly.
    • Natively integrated with Entity Framework
    Cons:
    • The DbGeography/DbGeometry types belong to System.Data.Spatial. Therefore, we're always tied to the database model, even if just conceptually.
    • Requires .NET 4.5 (at least in the Beta 2. I don't know if support for 4.0 is on the road)


    Now, allow me to dissect these points:

    Spatial Abstraction

    Regarding the abstraction, the folks that developed NHibernate Spatial decided to use IGeoAPI. It defines a bunch of interfaces in an attempt of standardizing the spatial types and operations. They're even agnostic to the fact that a database exists. For example, in NHibernate our POCO could be declared like:
    public class Country
    {
    public virtual IPoint Location { get; set; }
    public virtual IPolygon Area { get; set; }
    }

    NHibernate Spatial uses a library called NetTopologySuite to implement these interfaces. Then, even if no database is involved, we have access to a full-set of spatial operations in our C# code.

    With Entity Framework this is not the case. The same class would be declared as:
    public class Country
    {
    public DbGeography Location { get; set; }
    public DbGeography Area { get; set; }
    }

    The DbGeography class belongs to the System.Data.Spatial namespace. We're tied to a Database Type in our C# code, even if deep inside the business logic. Heck, the class even has a "Db" prefix, so the intent is clear.  In most cases this could just be a minor nuisance, but from an architectural point of view the NHibernate Spatial approach seems much more elegant and logic.

    .NET Version
    Well, NHibernate works perfectly with .NET 3.5. Not much to be said there. However, the spatial types of Entity Framework 5 (beta 2) only work in .NET 4.5. So, for projects to be released in a short time-frame, using DbGeography/DbGeometry doesn't seem like a viable option.

    Support
    I've already blogged about this. Basically NHibernate Spatial is a really nice boat that seems to be sailing without a captain. So, to use it will require an additional investment of time to set the boat on the correct course. If a crippling bug is found (already happened to me), you'll have to fix it yourself.
    The spatial types in Entity Framework, being completely integrated with the Entity Framework library itself, will have the backing of Microsoft.

    Setting Up
    NHibernate Spatial is not that hard to set, but it's not a breeze. As I've demonstrated in a previous blog post, the mappings require special care.
    Well, with Entity Framework everything just works out-of-the-box, including spatial support. You can even generate your model from the database and the spatial fields are set correctly.

    Querying with LINQ
    The spatial queries with Entity Framework work flawlessly. With NHibernate Spatial they do not. So, to use NHibernate Spatial to its full extent one has to use HQL, which can be a pain to maintain.


    The Veredict
    The spatial support in Entity Framework wins hands-down to NHibernate Spatial. From an ORM point of view, I actually prefer NHibernate to Entity Framework, but I'll seriously consider using Entity Framework if the spatial requirements of a project are of significant importance.

    This concludes this very short series on Entity Framework 5 and Spatial Data.

    Parsing UTFGrid data to polygons

    $
    0
    0
    I've talked previously about UTFGrid. It provides, as described by Development Seed, "a standard, scalable way of encoding data for hundreds or thousands of features alongside your map tiles".

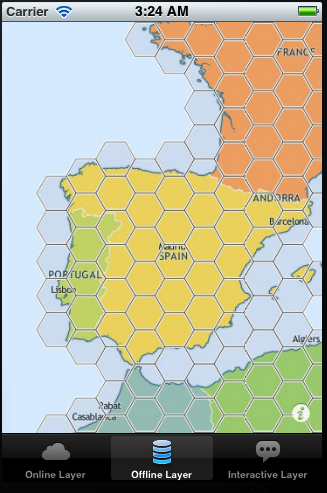
    So, to sum it up, if we have this image tile for the hexagons of one of my previous posts.


    We would have a corresponding json file with this UTFGrid
     !!!!!!!!!!!!!!!!!###################$$$$$$$$$$$$$$%%
    !!!!!!!!!!!!!!!!####################$$$$$$$$$$$$$$%%
    !!!!!!!!!!!!!!######################$$$$$$$$$$$$%%%
    !!!!!!!!!!!!!!######################$$$$$$$$$$$$%%%
    &&&&&&&&&&&&&&######################''''''''''''%%%
    &&&&&&&&&&&&&&&&####################''''''''''''''%%
    &&&&&&&&&&&&&&&&&###################''''''''''''''%%
    &&&&&&&&&&&&&&&&&&##################''''''''''''''''%
    &&&&&&&&&&&&&&&&&&&#################'''''''''''''''''
    &&&&&&&&&&&&&&&&&&&&################''''''''''''''''''
    &&&&&&&&&&&&&&&&&&&&&&##############'''''''''''''''''''
    &&&&&&&&&&&&&&&&&&&&&&##############'''''''''''''''''''
    &&&&&&&&&&&&&&&&&&&&&&&&############''''''''''''''''''''
    &&&&&&&&&&&&&&&&&&&&&&&&############''''''''''''''''''''
    &&&&&&&&&&&&&&&&&&&&&&&&((((((((((((''''''''''''''''''''
    &&&&&&&&&&&&&&&&&&&&&&(((((((((((((('''''''''''''''''''
    &&&&&&&&&&&&&&&&&&&&&(((((((((((((((''''''''''''''''''
    &&&&&&&&&&&&&&&&&&&&((((((((((((((((''''''''''''''''''
    &&&&&&&&&&&&&&&&&&(((((((((((((((((('''''''''''''''')
    &&&&&&&&&&&&&&&&&&(((((((((((((((((('''''''''''''''')
    &&&&&&&&&&&&&&&&((((((((((((((((((((''''''''''''''))
    &&&&&&&&&&&&&&&((((((((((((((((((((('''''''''''''))
    &&&&&&&&&&&&&&(((((((((((((((((((((('''''''''''')))
    **&&&&&&&&&&&&(((((((((((((((((((((('''''''''''+)))
    ***************(((((((((((((((((((((+++++++++++++))
    ****************((((((((((((((((((((++++++++++++++))
    ******************((((((((((((((((((++++++++++++++++)
    ******************((((((((((((((((((++++++++++++++++)
    ********************((((((((((((((((++++++++++++++++++
    *********************(((((((((((((((++++++++++++++++++
    **********************((((((((((((((+++++++++++++++++++
    ***********************(((((((((((((+++++++++++++++++++
    ************************((((((((((((++++++++++++++++++++
    ************************(((((((((((,++++++++++++++++++++
    ***********************,,,,,,,,,,,,,+++++++++++++++++++
    **********************,,,,,,,,,,,,,,+++++++++++++++++++
    ********************,,,,,,,,,,,,,,,,++++++++++++++++++
    ********************,,,,,,,,,,,,,,,,++++++++++++++++++
    ******************,,,,,,,,,,,,,,,,,,++++++++++++++++-
    *****************,,,,,,,,,,,,,,,,,,,++++++++++++++--
    ****************,,,,,,,,,,,,,,,,,,,,++++++++++++++--
    **************,,,,,,,,,,,,,,,,,,,,,,++++++++++++---
    **************,,,,,,,,,,,,,,,,,,,,,,++++++++++++---
    ..............,,,,,,,,,,,,,,,,,,,,,,////////////---
    ................,,,,,,,,,,,,,,,,,,,,//////////////--
    .................,,,,,,,,,,,,,,,,,,,//////////////--
    ..................,,,,,,,,,,,,,,,,,,////////////////-
    ...................,,,,,,,,,,,,,,,,,/////////////////
    ....................,,,,,,,,,,,,,,,,//////////////////
    ......................,,,,,,,,,,,,,,///////////////////
    ......................,,,,,,,,,,,,,,///////////////////
    ........................,,,,,,,,,,,,////////////////////
    ........................,,,,,,,,,,,,////////////////////
    ........................000000000000////////////////////
    ......................00000000000000///////////////////
    .....................000000000000000//////////////////
    ....................0000000000000000//////////////////
    ...................00000000000000000////////////////1
    ..................000000000000000000////////////////1
    ................00000000000000000000//////////////11
    ................00000000000000000000//////////////11
    ..............0000000000000000000000////////////111
    .............0000000000000000000000//////////22111
    00000000000000000000000222222222222111

    Each symbol matches a certain feature. Each symbol representation maps a 4x4 pixels rectangle, thus, we have a 64x64 UTFGrid mapping a 256x256 tile image. A little bit of precision is lost, but the performance gain makes up for it.

    Now, this data is then used to provide an interactive experience on otherwise raster data, allowing click and hover interaction. Check, for example, this page.

    This approach however, has its limitations. We don't really have the vector data in client-side, as this is just a "trick" to provide some interaction features. The MapBox folks created a project called Glower which provides an additional feature: painting the data in client-side using HTML5. You can check it in action here.

    Anyway, I don't really like the way it's done. It basically checks the character that is being hovered, paints itself and all the similar neighbors with small 4x4 rectangles. It doesn't work well in all browsers and is kind-of limiting.


    What I would really like is to parse the UTFGrid and produce vector data, namely polygons. Then, with the polygons, one could do much more interesting stuff, like using the Map API to draw the data (without resorting to HTML5). To be honest I'm not particular sure on what will come out of this but, in a worst case scenario, I had some fun trying to come up with this algorithm.

    Anyway, I want to pick something like this:
               
    and somehow extract the following polygons:                    

    Each polygon is composed of a bunch of vertex in a certain order. At first hand this may seem a trivial task, but it certainly wasn't for me. Not the coding part, but creating the algorithm itself. I tried to find something on the web that could be useful, but the only thing that really mapped itself to my problem was the "Convert raster to vector" algorithms, and using them would be like "killing a fly with a sledgehammer".

    After some thought (and failed attempts) I devised an algorithm that I've baptized as "Domino Sweep" (fancy name, heh?).

    I expect good performance because I create all the polygons in a single matrix iteration after visiting each row and column, regardless on the number of polygons displayed.

    While traversing the matrix elements, I check the border edges produced on that particular element. For example, in line 1 column 3, the "A" element has a "border" to the north, east and south. I process the edges in a clockwise order, trying to find a polygon on which I may add the edge. I call this "Domino Sweep" because I only look at the first and last point of each polygon to see if they match any of the vertices of the current edge.


    So, this is it:

    For each element (row/column):
    • Check border edges (matrix limits or a border with a different symbol element)
    • For each border edge see if they may be added to an existing polygon for that particular feature
    • If there's no match, create a new polygon with that edge
    • If there's a match, add the edge to that polygon, connecting the similar vertex (like domino)
    • If there's a additional matching polygon, it means that we can merge both
    I've implemented it in C#. The following code is not yet polished, but the algorithm works really well.

    using System;
    using System.Collections.Generic;
    using System.Drawing;
    using System.Linq;

    namespace UTFGridParser
    {

    [Flags]
    enum EdgeType
    {
    None = 0,
    Top = 1,
    Right = 2,
    Bottom = 3,
    Left = 4
    }

    class Point
    {
    public Point(int y, int x)
    {
    X = x;
    Y = y;
    }
    public int X { get; set; }
    public int Y { get; set; }

    public override string ToString()
    {
    return string.Format("({0},{1}", Y, X);
    }

    public override bool Equals(object obj)
    {
    var p = obj as Point;

    if(p == null)
    {
    return false;
    }

    return p.X == X && p.Y == Y;
    }

    public Polyline Polyline { get; set; }
    }


    class Polyline
    {
    public Polyline()
    {
    Points = new List<Point>();
    }

    public List<Point> Points { get; set; }

    public Point StartPoint
    {
    get
    {
    return Points.Count == 0 ? null : Points[0];
    }
    }

    public Point EndPoint
    {
    get
    {
    return Points.Count == 0 ? null : Points[Points.Count - 1];
    }
    }
    }

    class Edge
    {
    public Edge(int row, int column, EdgeType edgeType)
    {
    switch (edgeType)
    {
    case EdgeType.Top:
    PointA = new Point(row, column);
    PointB = new Point(row, column + 1);
    break;
    case EdgeType.Right:
    PointA = new Point(row, column + 1);
    PointB = new Point(row + 1, column + 1);
    break;
    case EdgeType.Bottom:
    PointA = new Point(row + 1, column);
    PointB = new Point(row + 1, column + 1);
    break;
    case EdgeType.Left:
    PointA = new Point(row, column);
    PointB = new Point(row + 1, column);
    break;
    }
    }

    /// <summary>
    /// First point of the edge
    /// </summary>
    public Point PointA { get; set; }

    /// <summary>
    /// Second point of the edge
    /// </summary>
    public Point PointB { get; set; }

    public override string ToString()
    {
    return string.Format("{0} - {1}", PointA, PointB);
    }

    }

    class Program
    {
    static void Main()
    {

    var polygons = new Dictionary<char, List<Polyline>>();

    string[] utfGrid = {
    "AAADDDD",
    "AADDDDD",
    "AAACCCC",
    "EEFFFGG",
    "EEFFFFF",
    "HHHHHHH"
    };

    for(int i =0; i < utfGrid.Length; i++)
    {
    for (int j = 0; j < utfGrid[i].Length; j++)
    {
    char currentKey = utfGrid[i][j];

    if(currentKey == ' ')
    {
    continue;
    }


    //top edge
    if (i == 0 || utfGrid[i - 1][j] != currentKey)
    {
    var newEdge = new Edge(i, j, EdgeType.Top);
    AddEdge(newEdge, currentKey, polygons);
    }

    //right edge
    if (j == utfGrid[i].Length - 1 ||
    utfGrid[i][j + 1] != currentKey)
    {
    var newEdge = new Edge(i, j, EdgeType.Right);
    AddEdge(newEdge, currentKey, polygons);
    }

    //bottom edge
    if (i == utfGrid.Length - 1 ||
    utfGrid[i + 1][j] != currentKey)
    {
    var newEdge = new Edge(i, j, EdgeType.Bottom);
    AddEdge(newEdge, currentKey, polygons);
    }

    //left edge
    if (j == 0 || utfGrid[i][j - 1] != currentKey)
    {
    var newEdge = new Edge(i, j, EdgeType.Left);
    AddEdge(newEdge, currentKey, polygons);
    }

    }
    }

    }

    private static void AddEdge(Edge newEdge,
    char currentKey,
    Dictionary<char, List<Polyline>> polygons)
    {
    if (!polygons.ContainsKey(currentKey))
    {
    polygons.Add(currentKey, new List<Polyline>());
    }

    var currentPolygons = polygons[currentKey];

    //Find a polygon which connects with the current edge

    Polyline matchingPolyline = null;

    foreach (var polyline in currentPolygons)
    {

    if (matchingPolyline != null)
    {
    if (matchingPolyline.EndPoint.Equals(polyline.StartPoint))
    {
    matchingPolyline.Points.AddRange(polyline.Points.Skip(1));
    currentPolygons.Remove(polyline);
    break;
    }

    if (matchingPolyline.EndPoint.Equals(polyline.EndPoint))
    {
    var points = new List<Point>(polyline.Points);
    points.Reverse();
    points.RemoveAt(0);

    matchingPolyline.Points.AddRange(points);
    currentPolygons.Remove(polyline);
    break;
    }

    if (matchingPolyline.StartPoint.Equals(polyline.EndPoint))
    {
    matchingPolyline.Points.InsertRange(0,
    polyline.Points.Take(polyline.Points.Count - 1));
    currentPolygons.Remove(polyline);
    break;
    }

    if (matchingPolyline.StartPoint.Equals(polyline.StartPoint))
    {

    var points = new List<Point>(polyline.Points);
    points.RemoveAt(0);
    points.Reverse();

    matchingPolyline.Points.InsertRange(0, points);
    currentPolygons.Remove(polyline);
    break;
    }

    }


    //check all points
    if (polyline.StartPoint.Equals(newEdge.PointA))
    {
    polyline.Points.Insert(0, newEdge.PointB);
    matchingPolyline = polyline;
    continue;
    }

    if (polyline.StartPoint.Equals(newEdge.PointB))
    {
    polyline.Points.Insert(0, newEdge.PointA);
    matchingPolyline = polyline;
    continue;
    }

    if (polyline.EndPoint.Equals(newEdge.PointA))
    {
    polyline.Points.Add(newEdge.PointB);
    matchingPolyline = polyline;
    continue;
    }

    if (polyline.EndPoint.Equals(newEdge.PointB))
    {
    polyline.Points.Add(newEdge.PointA);
    matchingPolyline = polyline;
    continue;
    }
    }

    if (matchingPolyline == null)
    {
    var newPolyline = new Polyline();
    newPolyline.Points.Insert(0,newEdge.PointA);
    newPolyline.Points.Insert(0,newEdge.PointB);

    currentPolygons.Add(newPolyline);
    }
    }
    }
    }
    I'll eventually write the code in Javascript and then, let the fun begin :P

    Mobile game development - The road so far

    $
    0
    0

    I've loved gaming since my first Spectrum in 86. Although I don't play as much as before I still try to find the time for some Skyrim, Battlefield, Uncharted, etc.

    Anyway, that's the "consumer" side of it. Some months ago I started to delve into game development, particularly on the mobile space. As I had just bought a Mac I decided to target iOS.

    Long story short, this has been the road so far:
    • Bought a Mac
    • Enrolled in a Apple Developer Program (meaning, paid 100 usd)
    • Stared at XCode and ObjectiveC scratching my head
    • Researched
    • Tried to develop a game
    • Failed miserably
    • (paused 6 months)
    • Re-Research
    • Current Time

    Tools/Languages that I've used during my attempts/research (in chronological order)

    ObjectiveC

    When I first looked at ObjectiveC it seemed really strange. All those "[", "]" and... manual memory management. Nasty stuff.

    Anyway, after a small learning curve it really became second nature. It's not that different to C++, and even the memory management stuff is very straightforward (although easy to forget).

    Obviously we, the c# developers, are very spoiled. I really miss my LINQ, the garbage collector, my lambdas (albeit existing something similar in ObjectiveC), but heck, that's life. Could be worse.

    XCode

    XCode sucks when compared to Visual Studio and really seems a generation behind. It's better now, but still lacking. Well, at least it's free :)


    Marmalade

    After looking at ObjectiveC and XCode, and before I really gave them a chance, I looked for an alternative. Marmalade provides a cross-platform development experience in C++, with the added bonus of allowing Windows development in Visual Studio. It seemed too good to be true.

    I tried it out for some time, and even started developing a game with it. It didn't turn out very well. This library is very low level, and is clearly more focused in 3D gaming. It seems perfect for those companies that already have some games in C++ and want to port them to several platforms. Also, it's not free. the trial was like 90 days so was enough for me to dismiss it.


    Cocos2d

    Then I stumbled on this library. I don't really know how I didn't find it sooner, as it's the "de facto" library for 2D gaming on iOS. It's free, supported, has thousands and thousands of people using it and it really simplifies game development.


    Anyway, I bought a book on Cocos2d game development and it was relatively easy to get into it.


    I chose one of my gaming ideas and started developing it. I implemented some of the game logic, physics (using Box2D), and all seemed well... until I started to think on level creation. While using Cocos2D, I was placing/tweaking every object in code. It's essential to have some kind of editor to easily edit/create stuff. I looked at InkScape, a free SVG editor, and was in the process of developing some kind of SVG parser to create my levels. Anyway, seemed too much trouble at the time, so I kinda lost my motivation and gradually suspended my game developing effort.


    LevelHelper

    Recently I discovered LevelHelper. It's basically two things: a really nice level editor and a bunch of helper APIs. You design the level in a separate application and code it in Cocos2D as before, with some added benefits. It's not free but costs like 20 bucks or such. A bargain if you ask me. Anyway, after trying it I'm not going back, and am decided on implementing my game using it. 


    Cocos2d-x


    LevelHelper also supports other frameworks. One of them is Cocos2d-x. It's basically a C++ port of Cocos2d which allows it to run multiplatform. I've asked the author of LevelHelper if he plans to keep the compatibility with Cocos2D-X, which he confirmed. Thus, I'll used Cocos2d-X for my development.


    Although I don't dislike ObjectiveC, I prefer C++. If I ever manage to finish my game, and eventually want to port it to Android, it will be a walk in the park, as it also supports C++.


    To sum it up, this is where I stand now. Developing my game using:
    • LevelHelper
    • Cocos2D-X with Box2D (C++)
    • XCode 4.3
    It's all still in a very early phase, but I plan to post some stuff on game development in the context of these tools/libraries.


    Video Tutorial: Scrollable layer with Parallax (LevelHelper + Cocos2d-X)

    $
    0
    0
    A nice game level selection mechanism, particularly for "world" selection, is a scrollable layer that snaps to specific points. Also, I want to mix this with a parallax effect.

    I've created a video tutorial that shows how to create this effect using LevelHelper, SpriteHelper and Cocos2d-x. Don't mind the sucky minimalistic "art" :)

    It's my first video tutorial ever, so keep your expectations moderated :P


    The process, as described in the video is:
    • Create a Cocos2d-x project
    • Create a Project in LevelHelper
    • Use SpriteHelper to create the sprites
    • Create the parallax layer in LevelHelper, using the new sprites
    • Place the billboard sprites in LevelHelper, assigning them a special tag
    • Export the Cocos2d-X code (would also work the same with Cocos2D)
    • In XCode, handle both the touchmove and touchend events
    • On touchmove move the parallax on a ratio of 1:1 with the gesture
    • On touchend try to find the nearest snapping point, and trigger an animation to move the parallax to that point.

    The source-code used in the tutorial is:

    HelloWorldScene.h:
    --------------------
    inside the private section
    LevelHelperLoader* loader;
    LHParallaxNode* myParallax;

    HelloWorldScene.cpp
    ----------------------
    HelloWorld::HelloWorld()
    loader = new LevelHelperLoader("ScrollableParalax.plhs");
    myParallax = loader->paralaxNodeWithUniqueName("Parallax_1");

    HelloWorld::ccTouchesMoved()
    CCSetIterator it;
    CCTouch* touch;

    for( it = touches->begin(); it != touches->end(); it++)
    {
    touch = (CCTouch*)(*it);

    if(!touch)
    break;

    CCPoint location = touch->locationInView();
    location = CCDirector::sharedDirector()->convertToGL(location);

    CCPoint prevLocation = touch->previousLocationInView();
    prevLocation = CCDirector::sharedDirector()->convertToGL(prevLocation);

    CCPoint touchDelta = ccpSub(location,prevLocation);

    if(NULL != myParallax)
    {
    CCPoint parallaxPosition = myParallax->getPosition();
    myParallax->setPosition(ccp(parallaxPosition.x + touchDelta.x, parallaxPosition.y + touchDelta.y));
    }
    }

    HelloWorld::ccTouchesEnded()
    //find nearest selector

    CCArray* sprTag = loader->spritesWithTag(SELECTOR);

    if(sprTag->count() == 0)
    {
    return;
    }

    float minOffset = MAXFLOAT;

    for(int i =0; i< sprTag->count(); ++i)
    {
    LHSprite* curSprite = (LHSprite*)sprTag->objectAtIndex(i);
    float spritePosition = curSprite->getPositionX();

    CCSize screenSize = CCDirector::sharedDirector()->getWinSize();

    float centerPosition = screenSize.width/2 -
    curSprite->getRealScale().width / 2;
    float offset = centerPosition - spritePosition;

    if(abs(offset) < abs(minOffset))
    {
    minOffset = offset;
    }
    }

    CCPoint parallaxPosition = myParallax->getPosition();


    //if less than a threshold snap directly without any animation

    if(abs(minOffset) < 50)
    {
    myParallax->setPosition(
    ccp(parallaxPosition.x + minOffset, parallaxPosition.y));
    }
    else
    {
    myParallax->runAction(
    CCMoveBy::actionWithDuration(0.3f, ccp(minOffset, 0)));
    }

    HelloWorld::~HelloWorld
    delete myParallax;
    myParallax = NULL;

    Create 3D objects inside Cocos2D-x (Part 1 - Introduction)

    $
    0
    0
    Part 1 - Introduction
    Part 2 - Menus

    Cocos2D-x is, as you might infer from its name, a 2d gaming library. But, as it uses OpenGL internally to draw its stuff, we might leverage it to create some 3D objects on the mix.

    In this post I'm going to show how to create a  bunch of animated 3D boxes inside a Cocos2D-X scene mixed with 2D sprites.


    Although I don't recommend using Cocos2D-x for making a complete 3D game, adding some 3D objects might bring some interesting effects.
    You can check the end-result of this simple demo in the following video:


    Disclaimer:
    I'm not a C++ / openGL expert so I don't guarantee that I've implemented everything in the best way possible. It has some known issues like:
    • doesn't allow you to draw sprites on top of the boxes
    • the gluLookAt call shouldn't be inside the Box class draw method
    • the color shading is hardcoded
    • and so on, so on... 
    Anyway, use this code freely it if you want, although this is far from "production ready". It's meant to be a proof of concept.

    Steps:
    • Create a new project using the Cocos2D-x template
    • Add the following files to your project:
    OpenGLCommon.h
    #ifndef _OPENGL_COMMON_H
    #define _OPENGL_COMMON_H

    typedef struct {

    GLfloat x;
    GLfloat y;
    GLfloat z;

    } Vector3D;

    static inline Vector3D vec(const GLfloat x, const GLfloat y, const GLfloat z)
    {
    Vector3D v;
    v.x = x;
    v.y = y;
    v.z = z;
    return v;
    }

    #endif


    Box.h
    #ifndef _BOX_h
    #define _BOX_h

    #include "cocos2d.h"
    #include "OpenGLCommon.h"

    class Box : public cocos2d::CCNode
    {

    public:
    Box();
    virtual void draw();
    static Box* boxWithSizeAndPosition(Vector3D size, Vector3D position);
    void setPosition(Vector3D vector);
    void setSize(Vector3D vector);
    Vector3D getSize();

    private:
    Vector3D position;
    Vector3D size;
    };

    #endif


    Box.cpp
    #include "Box.h"
    using namespace cocos2d;

    Box::Box()
    {
    }

    Box* Box::boxWithSizeAndPosition(Vector3D size, Vector3D position)
    {

    Box *box = new Box();
    box->setPosition(position);
    box->setSize(size);
    box->autorelease();
    return box;
    }

    void Box::setPosition(Vector3D vector)
    {
    position = vector;
    }

    void Box::setSize(Vector3D vector)
    {
    size = vector;
    }

    Vector3D Box::getSize()
    {
    return size;
    }

    void Box::draw()
    {
    GLfloat maxX = size.x / 2.0f;
    GLfloat minX = maxX * -1;
    GLfloat maxY = size.y / 2.0f;
    GLfloat miny = maxY * -1;

    const GLfloat frontVertices[] = {
    minX, miny, size.z,
    maxX, miny, size.z,
    minX, maxY, size.z,
    maxX, maxY, size.z,
    };

    const GLfloat backVertices[] = {
    minX, miny, 0.0f,
    minX, maxY, 0.0f,
    maxX, miny, 0.0f,
    maxX, maxY, 0.0f,
    };

    const GLfloat leftVertices[] = {
    minX, miny, size.z,
    minX, maxY, size.z,
    minX, miny, 0.0f,
    minX, maxY, 0.0f,
    };

    const GLfloat rightVertices[] = {
    maxX, miny, 0.0f,
    maxX, maxY, 0.0f,
    maxX, miny, size.z,
    maxX, maxY, size.z,
    };

    const GLfloat topVertices[] = {
    minX, maxY, size.z,
    maxX, maxY, size.z,
    minX, maxY, 0.0f,
    maxX, maxY, 0.0f,

    };

    const GLfloat bottomVertices[] = {
    minX, miny, size.z,
    minX, miny, 0.0f,
    maxX, miny, size.z,
    maxX, miny, 0.0f,
    };


    glEnable(GL_CULL_FACE);
    glCullFace(GL_BACK);
    glDisableClientState(GL_COLOR_ARRAY);
    glDisableClientState(GL_TEXTURE_COORD_ARRAY);

    glLoadIdentity();

    cocos2d::gluLookAt(0, 0, 5, 0, 0, 0, 0, 1, 0);

    glTranslatef(position.x, position.y, position.z);

    glVertexPointer(3, GL_FLOAT, 0, frontVertices);
    glColor4f(1.0f, 1.0f, 1.0f, 1.0f);
    glDrawArrays(GL_TRIANGLE_STRIP, 0, 4);

    glVertexPointer(3, GL_FLOAT, 0, backVertices);
    glDrawArrays(GL_TRIANGLE_STRIP, 0, 4);

    glVertexPointer(3, GL_FLOAT, 0, leftVertices);
    glColor4f(0.5f, 0.5f, 0.5f, 1.0f);
    glDrawArrays(GL_TRIANGLE_STRIP, 0, 4);

    glVertexPointer(3, GL_FLOAT, 0, rightVertices);
    glDrawArrays(GL_TRIANGLE_STRIP, 0, 4);

    glVertexPointer(3, GL_FLOAT, 0, topVertices);
    glColor4f(0.7f, 0.7f, 0.7f, 1.0f);
    glDrawArrays(GL_TRIANGLE_STRIP, 0, 4);

    glVertexPointer(3, GL_FLOAT, 0, bottomVertices);
    glDrawArrays(GL_TRIANGLE_STRIP, 0, 4);

    glEnableClientState(GL_COLOR_ARRAY);
    glEnableClientState(GL_TEXTURE_COORD_ARRAY);
    glDisable(GL_CULL_FACE);
    glColor4f(1.0f, 1.0f, 1.0f, 1.0f);

    }
    • Also, modify:
    HelloWorldScene.h
    #ifndef __HELLOWORLD_SCENE_H__
    #define __HELLOWORLD_SCENE_H__

    #include "cocos2d.h"
    #include "Box.h"

    class HelloWorld : public cocos2d::CCLayer
    {
    public:

    virtual bool init();

    virtual void draw();

    void tick(cocos2d::ccTime dt);
    static cocos2d::CCScene* scene();

    virtual void menuCloseCallback(CCObject* pSender);

    LAYER_NODE_FUNC(HelloWorld);

    private:
    cocos2d::CCSet *set;
    };

    #endif // __HELLOWORLD_SCENE_H__


    HelloWorldScene.cpp
    #include "HelloWorldScene.h"
    #include "SimpleAudioEngine.h"

    using namespace cocos2d;
    using namespace CocosDenshion;

    CCScene* HelloWorld::scene()
    {
    CCScene *scene = CCScene::node();

    HelloWorld *layer = HelloWorld::node();

    scene->addChild(layer);

    return scene;
    }

    bool HelloWorld::init()
    {
    if ( !CCLayer::init() )
    {
    return false;
    }

    CCMenuItemImage *pCloseItem = CCMenuItemImage::itemFromNormalImage(
    "CloseNormal.png",
    "CloseSelected.png",
    this,
    menu_selector(HelloWorld::menuCloseCallback) );
    pCloseItem->setPosition( ccp(CCDirector::sharedDirector()->getWinSize().width - 20, 20) );


    CCMenu* pMenu = CCMenu::menuWithItems(pCloseItem, NULL);
    pMenu->setPosition( CCPointZero );
    this->addChild(pMenu, 1);

    // ask director the window size
    CCSize size = CCDirector::sharedDirector()->getWinSize();


    // add "HelloWorld" splash screen"
    CCSprite* pSprite = CCSprite::spriteWithFile("HelloWorld.png");

    // position the sprite on the center of the screen
    pSprite->setPosition( ccp(size.width/2, size.height/2) );

    // add the sprite as a child to this layer
    this->addChild(pSprite, 0);

    set = new CCSet();

    Vector3D boxSize = vec(0.5f,0.5f,0.01f);

    set->addObject(Box::boxWithSizeAndPosition(boxSize, vec(1.5f, 1.5f, 0.0f)));
    set->addObject(Box::boxWithSizeAndPosition(boxSize, vec(1.5f, 0.5f, 0.0f)));
    set->addObject(Box::boxWithSizeAndPosition(boxSize, vec(1.5f,-0.5f, 0.0f)));
    set->addObject(Box::boxWithSizeAndPosition(boxSize, vec(1.5f,-1.5f, 0.0f)));
    set->addObject(Box::boxWithSizeAndPosition(boxSize, vec(-1.5f, 1.5f,0.0f)));
    set->addObject(Box::boxWithSizeAndPosition(boxSize, vec(-1.5f, 0.5f,0.0f)));
    set->addObject(Box::boxWithSizeAndPosition(boxSize, vec(-1.5f,-0.5f,0.0f)));
    set->addObject(Box::boxWithSizeAndPosition(boxSize, vec(-1.5f,-1.5f,0.0f)));

    CCSetIterator it;

    for( it = set->begin(); it != set->end(); it++)
    {
    this->addChild((Box*)(*it));
    }

    schedule( schedule_selector(HelloWorld::tick) );
    return true;
    }

    void HelloWorld::tick(ccTime dt)
    {
    CCSetIterator it;
    Box* box;

    for( it = set->begin(); it != set->end(); it++)
    {
    box = (Box*)(*it);

    Vector3D size = box->getSize();

    if(size.z < 2.0)
    {
    size.z += size.z * 0.05;
    box->setSize(size);
    }
    }
    }

    void HelloWorld::draw()
    {
    }

    void HelloWorld::menuCloseCallback(CCObject* pSender)
    {
    CCDirector::sharedDirector()->end();

    #if (CC_TARGET_PLATFORM == CC_PLATFORM_IOS)
    exit(0);
    #endif
    }


    If you have any doubts regarding the code don't be afraid to ask.

    Create 3D objects inside Cocos2D-x (Part 2 - Menus)

    $
    0
    0

    In my previous post I've created a very rough experiment showing some 3D boxes on top of the default Cocos2d-X template.

    In this post I'm going to create something a little bit more useful: a level selection mechanism in 3D. This demo uses some additional concepts like:
    • Texturing
    • Changing the POV (Point-of-view) based on the device accelerometer
    • Click-detection
    When launching the application we have the following screen:


    Tilting the device changes the perspective.


    When a box is clicked it changes color and collapses to the ground.


    Here's a video showing the selection behavior (without the accelerometer part because the emulator doesn't support it).


    Note: don't mind the frame-rate in the video. My 2007 Mac-Mini struggles a little bit running the emulator while video-recording. In my iPad I have steady 60 FPS.

    Texturing
    The texture on top of the box is dynamically generated by combining 3 different layers:
    • The base color (which changes if the box is selected)
    • The metal frame
    • The level number 
    The following image represents this overlay.

    The code to generate the top texture is:


    CCTexture2D* Box::createTopTexture(GLfloat r, GLfloat g, GLfloat b, const char* level) 
    {
    float textureSize = 256;

    CCRenderTexture *rt = CCRenderTexture::renderTextureWithWidthAndHeight(textureSize, textureSize);

    rt->beginWithClear(r, g, b, 1.0);

    std::string file = (std::string(level) + std::string(".png"));
    CCSprite *levelImage = CCSprite::spriteWithFile(file.c_str());
    levelImage->setBlendFunc((ccBlendFunc){GL_ONE, GL_ONE_MINUS_SRC_ALPHA});
    levelImage->setPosition(ccp(textureSize/2, textureSize/2));
    levelImage->visit();

    CCSprite *frame = CCSprite::spriteWithFile("frame.png");
    frame->setBlendFunc((ccBlendFunc){GL_ONE, GL_ONE_MINUS_SRC_ALPHA});
    frame->setPosition(ccp(textureSize/2, textureSize/2));
    frame->visit();

    rt->end();

    return rt->getSprite()->getTexture();
    }

    The "selected" version also uses the same method but passing a yellow background color as an argument.

    Changing the POV
    The secret to this functionality is the gluLookAt function. This function is already included inside Cocos2d-x (and Cocos2d) and was borrowed from an OpenGL library called the GLU - OpenGL Utility Library.

    I call it like this in my demo:

    gluLookAt(camera.x, camera.y, camera.z, 0, 0, 0, 0, 1, 0)

    meaning:

    The first 3 arguments represent the point where the camera is located.
    The following 3 are always (0,0,0) and represent the point where the camera is pointed to.
    The following 3 represent the upwards vector of the camera. It will always be (0,1,0) in this case.

    The camera position varies with the accelerometer. This is achieved with this code:
    void HelloWorld::didAccelerate(CCAcceleration* pAccelerationValue)
    {
    float x = pow(pAccelerationValue->x * 2.0, 3);
    float y = pow(pAccelerationValue->y * 1.5, 2);


    if(pAccelerationValue->y < 0)
    {
    y *= -1;
    }


    CCSetIterator it;
    Box* box;

    for( it = set->begin(); it != set->end(); it++)
    {
    box = (Box*)(*it);
    box->setCamera(vec(x, y, 6.0f));
    }

    }
    The math applied to the acceleration value was empirical and tried to limit the effect when the device is at its default position (ie., not tilted). When tilting the effect becomes exponentially more pronounced.

    Click Detection
    This is probably the most complex topic of the lot. Determining which object has been clicked on a 3D space (called as picking) involves ray casting a vector and determining the intersection with the objects in the 3d  world. As I said in my previous post, I'm not an OpenGL expert, so I struggled a lit bit with this.

    Fortunately I had an idea to simplify matters by making some assumptions. Well, I only want to check the click on the top of the boxes, which is a 2d plane. So, if I convert the world coordinates of the top-left/bottom-right corners of that plane to screen coordinates, I can easily test if they were clicked. Obviously this has a little error, especially when the screen is tilted and some of the boxes are not frontally facing the screen, but is negligible.

    To convert from world-coordinates I use the gluUnProject which, although also belongs to GLU, is not included in Cocos2d-X. I found an implementation of it on the web and included it on the project. I'm sorry for not crediting anyone for that but I don't recall where I got it from.

    So, I just unproject the corners of the boxes and know exactly where they are in screen space. For each box I store the screen coordinates of its corners. Then, when handling touches I just do this:
    void HelloWorld::ccTouchesBegan(CCSet *touches, CCEvent *pEvent)
    {
    CCSetIterator it;
    CCTouch* touch;

    for( it = touches->begin(); it != touches->end(); it++)
    {
    touch = (CCTouch*)(*it);

    if(!touch)
    break;

    CCPoint winPos = touch->locationInView();
    winPos = CCDirector::sharedDirector()->convertToGL(winPos);

    //CCLog("x: %f y: %f", winPos.x, winPos.y);

    CCSetIterator it;
    Box* box;

    for( it = set->begin(); it != set->end(); it++)
    {
    box = (Box*)(*it);

    if(winPos.x > box->getTopLeft().x &&
    winPos.x < box->getBottomRight().x &&
    winPos.y > box->getBottomRight().y &&
    winPos.y < box->getTopLeft().y)
    {
    box->setSelectedValue(true);
    }
    }
    }
    }

    I've included a zip with the full XCode project. You can download it here.

    Custom Map Tiles (Part 4 - Programmatically with EF 5)

    $
    0
    0

    Hi,

    After a pause from mapping related stuff, I couldn't resist going back for some more, especially having just downloaded Visual Studio 2012 RC1.

    In this post I'm going to show how to create tiles programatically at server-side using .NET 4.5 and Entity Framework 5 RC 1.

    I'll basically create an ASP.NET MVC 4.0 application which handles http tile requests, uses Entity Framework to fetch spatial data from a SQL Server database and produces a bitmap image using GDI+. Then I'll show these tiles on a Leaflet Map. This seems too much trouble for what is worth but sometimes you just need the extra control to do stuff that otherwise would be really difficult to do.

    As usual I'm going to show most of the steps to get this thing working, just jumping some hoops on simpler stuff. Anyway, even if some steps seem less clear I'm including a zip file with the whole solution.


    Step 1
    Download a shapefile

    I've downloaded a shapefile of the world from here

    Step 2
    Insert the shapefile data to a SQL Server database

    • Create an empty database called "SpatialDemo"
    • Use ogr2ogr to load the data.

    We can do this in a variety of ways. My suggestion: use a command-line tool from GDAL called ogr2ogr. There are several ways to get this library, including getting the source-code and compiling yourself. Myself, I prefer less fuss, so I downloaded a (not official) installer from this page: http://www.gisinternals.com/sdk/

    I've chosen the "MSVC2010 (Win64) -stable" category. Inside it I chose the "gdal-19-1600-x64-core.msi" installer. Direct link to the installer.

    After installing you get a nice command prompt with all the environment variables correctly registered and ready to use.


    Run the following command:
    ogr2ogr -f "MSSQLSpatial" "MSSQL:server=.;database=SpatialDemo;trusted_connection=yes" "TM_WORLD_BORDERS-0.3.shp" -overwrite -nln "Country"

    Most of the arguments are pretty much self explanatory. The "-nln" argument was used to specify the table name that will hold the geometry data.

    ogr2ogr created the following schema for us:


    If we run a query against the country table we can check that our spatial data is there.


    Step 3
    Create an ASP.NET MVC 4 project with 2 controllers and a custom route
    • HomeController
      • Index action
        • Index.cshtml with a Leaflet map definition
    • TileController   (route  Tile/{z}/{x}/{y}.png)
      • Get action
    The route is defined as:
    routes.MapRoute(
    name: "Tiles",
    url: "Tile/{z}/{x}/{y}",
    defaults: new { controller = "Tile", action = "Get" }
    );

    Now, lets add the Entity Framework bits. Since my previous post EF 5 is now in Release Candidate. Get it from NuGet. If you're using a NuGet version previous to 1.7 you won't have the "Include Prerelease" option.


    Create a model from the database of Step 2.


    Now let's create our action.

    The code for the Get action is as follows:
    [HttpGet]
    public FileResult Get(int z, int x, int y)
    {
    int nwX;
    int nwY;

    TileSystem.TileXYToPixelXY(x, y, out nwX, out nwY);

    double nwLatitude, nwLongitude;
    double seLatitude, seLongitude;

    TileSystem.PixelXYToLatLong(nwX, nwY, z, out nwLatitude, out nwLongitude);
    TileSystem.PixelXYToLatLong(nwX+256,nwY+256,z,out seLatitude,out seLongitude);

    var boundingBox = GetBoundingBox(nwLatitude,nwLongitude,seLatitude,seLongitude);

    var tile = new Bitmap(256, 256, PixelFormat.Format32bppArgb);

    var degreesPerPixel = (nwLatitude - seLatitude) / 256.0;

    using (SpatialDemo db = new SpatialDemo())
    {
    db.country
    .Where(c => c.ogr_geometry.Intersects(boundingBox))
    .Select(s => new
    {
    Geometry = SqlSpatialFunctions.Reduce(s.ogr_geometry,degreesPerPixel),
    Country = s.name
    })
    .ToList()
    .ForEach(g => ProcessCountry(z,nwX,nwY,tile,g.Geometry,g.Country));
    }

    var ms = new MemoryStream();
    tile.Save(ms, ImageFormat.Png);

    byte[] bytes = ms.ToArray();

    return File(bytes, "image/png");
    }
    I'be borrowed the transformation code from Bing Maps Tile System.

    This action is called for each tile and consists of:
    • Determining the coordinates of the top left/bottom right corner of the tile
    • Creating a bounding box for that corners
    • Fetch the database to get the countries which intersect that bounding box
    • While getting the data simplify it for the current zoom level (with the Reduce method)
    • Create a bitmap and return it

    The countries are painted in red, ranging from white to vivid red. The color is chosen according to the size of the name of each country. So, the "The former Yugoslav Republic of Macedonia" will have a white color, and  "Cuba" or "Iraq" will have vivid red. Pretty useless, I know, but a fun experiment nevertheless.

    The end result is this:


    The country names that I've used are not the ones that you can see in the OpenStreetMap. Anyway, don't mind that too much. The idea here is to show that we can programmatically do whatever we please to generate the tile images. For example: draw a watermark on the tile, draw a grid, paint a heatmap, draw a graph inside each country showing some stats, etc. The possibilities are endless.

    Anyway, here is the source-code for the solution that I've created. As usual, not production-ready code, but should be enough to get you started.


    Load-Testing ASP.NET MVC (Part 1 - Apache Workbench)

    $
    0
    0


    Performance is a critical aspect of most applications. Everything may be pretty, really well developed, intuitive and all, but if the performance is not up to par the user experience is going to suck.


    Unfortunately most of these performance problems only show themselves after some time in production, making them much more cumbersome to solve and handle.

    In this post I'm going to talk about something that should, IMHO, be integrated in the development lifecycle before the application goes live: Load-tests.


    I typically talk separately about performance-testing and load-testing. For me performance testing is something you would do with a profiler like dotTrace or ANTS, where you run your application in the context of a user, trigger some functionalities, take some snapshots and then analyze the results. Typically with a profiler you understand the code where most time is spent on.

    Load-testing is a different beast. You're testing the ability of the application to, with enough load, be able to handle requests at an acceptable rate.

    With a good load testing strategy, and taking into account the target hardware, you'll be able to estimate the capacity of your solution in terms of simultaneous users / requests. Also, and very importantly, you may understand if your solution is able to scale well or not. This is of extreme importance because nowadays it's cheaper (and less riskier) to buy a new server than to pay your developers to refactor/optimize the solution.

    With that in mind, in this series of posts I'm going to show some tools that I've used for load testing in the context of ASP.NET MVC, starting with a really basic one called Apache Workbench and then evolving into a much more powerful tool called jMeter.

    Apache Worbench

    For simpler scenarios nothing beats Apache Workbench. It's a single executable that is able to trigger simultaneous HTTP operations on a specific URL, displaying some really simple metrics.

    It's included with Apache, but it's not very practical to install Apache just to get this small executable. You can follow the tips here to get the file.


    Now, let's create our sample website. Nothing here will be ASP.NET MVC specific, so use anything that rocks your boat. I'm going to use the empty ASP.NET MVC template and create a really simple Home controller with an index action that returns a view.


    After extracting "ab.exe" lets run it at a command prompt. It's usage is:
    Usage: ab [options] [http://]hostname[:port]/path
    Options are:
    -n requests Number of requests to perform
    -c concurrency Number of multiple requests to make
    -t timelimit Seconds to max. wait for responses
    -b windowsize Size of TCP send/receive buffer, in bytes
    -p postfile File containing data to POST. Remember also to set -T
    -u putfile File containing data to PUT. Remember also to set -T
    -T content-type Content-type header for POSTing, eg.
    'application/x-www-form-urlencoded'
    Default is 'text/plain'
    -v verbosity How much troubleshooting info to print
    -w Print out results in HTML tables
    -i Use HEAD instead of GET
    -x attributes String to insert as table attributes
    -y attributes String to insert as tr attributes
    -z attributes String to insert as td or th attributes
    -C attribute Add cookie, eg. 'Apache=1234. (repeatable)
    -H attribute Add Arbitrary header line, eg. 'Accept-Encoding: gzip'
    Inserted after all normal header lines. (repeatable)
    -A attribute Add Basic WWW Authentication, the attributes
    are a colon separated username and password.
    -P attribute Add Basic Proxy Authentication, the attributes
    are a colon separated username and password.
    -X proxy:port Proxyserver and port number to use
    -V Print version number and exit
    -k Use HTTP KeepAlive feature
    -d Do not show percentiles served table.
    -S Do not show confidence estimators and warnings.
    -g filename Output collected data to gnuplot format file.
    -e filename Output CSV file with percentages served
    -r Don't exit on socket receive errors.
    -h Display usage information (this message)

    Let's start by running it as:
    ab -n10 -c1 http://localhost:5454/Home/Index

    We're basically issuing 10 sequential requests. The results:
    Concurrency Level:      1
    Time taken for tests: 0.041 seconds
    Complete requests: 10
    Failed requests: 0
    Write errors: 0
    Total transferred: 4390 bytes
    HTML transferred: 260 bytes
    Requests per second: 243.89 [#/sec] (mean)
    Time per request: 4.100 [ms] (mean)
    Time per request: 4.100 [ms] (mean, across all concurrent requests)
    Transfer rate: 104.56 [Kbytes/sec] received

    Connection Times (ms)
    min mean[+/-sd] median max
    Connect: 0 0 0.5 0 1
    Processing: 1 4 2.4 3 9
    Waiting: 1 3 2.4 3 9
    Total: 1 4 2.7 3 10

    Percentage of the requests served within a certain time (ms)
    50% 3
    66% 4
    75% 5
    80% 6
    90% 10
    95% 10
    98% 10
    99% 10
    100% 10 (longest request)
    Almost every metric here is useful and should be easy enough to understand. Typically the main metrics that I look for are:

    • Requests per second
    • The mean time per request
    • 95% interval -> meaning in this case that 95% of the times the request time is less or equal to 10 ms (this metric is commonly used in SLA specifications).

    Let's make things more interesting. I'm going to change my action to be:
    public ActionResult Index()
    {
    Thread.Sleep(500);
    return View();
    }
    Now, running the same command again:
    ab -n10 -c1 http://localhost:5454/Home/Index
    Results:
    Requests per second: 1.99
    Time per request: 503.29 (mean)
    95%: 504 ms
    Makes perfect sense. We're issuing sequential requests and every one takes half a second to execute.

    Now, if we add parallelism to the equation:
    ab -n10 -c10 http://localhost:5454/Home/Index
    Results:
    Requests per second: 9.89
    Time per request: 1011.058 (mean)
    95%: 1010 ms
    The performance starts to deteriorate. Although its processing almost 10 per second the mean time per request has surpassed 1 second.

    And we can even make it worse:
    ab -n100 -c100 http://localhost:5454/Home/Index
    Results:
    Requests per second: 16.40
    Time per request: 6099.349 (mean)
    95%: 6069 ms

    Almost 6 seconds por 
    Now, suppose that our SLA stated that we needed to handle 95% of the requests in less than 1 second. Our capacity would be around 10 simultaneous requests.

    It's not the focus of this post to try and optimize this code, but just for the fun of it, let's try to understand what's happening here.

    While issuing the Thread.Sleep, the thread is literally blocked half-a-second while waiting to resume execution. Obviously your own code would not have a Thread.Sleep (I hope), but the same principle applies while waiting for a synchronous query to the database, or a synchronous filesystem operation, etc.

    Let's make our operation asynchronous to see if it does improve the capacity of our application. Fun, fun, fun, let's use the new async/await goodness to create an asynchronous action. The code becomes just:
    public async Task<ViewResult> Index()
    {
    await Task.Delay(500);
    return View();
    }
    Freeking awesome. Let's test it with the same parameters as before:
    ab -n10 -c1 http://localhost:5454/Home/Index
    Results:
    Requests per second: 1.96
    Time per request: 510.129 (mean)
    95%: 517 ms
    ab -n10 -c10 http://localhost:5454/Home/Index
    Results:
    Requests per second: 19.16
    Time per request: 522.030 (mean)
    95%: 521 ms
    ab -n100 -c100 http://localhost:5454/Home/Index
    Results:
    Requests per second: 162.07
    Time per request: 617.035 (mean)
    95%: 602 ms
    Mean Time per Request (ms)
    So, as you can see, load-testing is very important. In my next post I'm going to show a much more powerful tool called jMeter. What I've shown here is just the tip of the iceberg.

    Load-Testing ASP.NET MVC (Part 2 - JMeter introduction)

    $
    0
    0


    Although Apache Workbench provides some simple and useful metrics it's a little bit limited. In this post I'm going to talk about a much more powerful tool for load-testing: JMeter (also from the Apache Foundation).

    I'll start by replicating the previous experiment that I did with Apache Worbench but using JMeter, and gradually adding more complexity to it.


    Let's get started:
    • Extract the archive somewhere on your disk and run the <folder>/bin/jmeter.bat file (Java required)
    JMeter is not a particularly intuitive application. When starting you get this home screen.


    You have a Test Plan node and a workbench. The workbench works like a Sandbox. Nothing you place there is saved implicitly with your tests. According to the JMeter manual the workbench is:

    "(..) a place to temporarily store test elements while not in use, for copy/paste purposes, or any other purpose you desire"

    Yeah, a little bit weird. Anyway, the Test Plan is where you place the test itself. If you right-click it you might be a little overwhelmed with all the available options, but the JMeter page does a really nice job in explaining each of the available options. You can check the manual at http://jmeter.apache.org/usermanual/.

    Step 1: Simple HTTP Get Requests

    Now, the typical basic JMeter test has a Thread, a Sampler and a Listener. In the context of our first test this will mean:
    • Thread: configuration of number of users and number of executions. Similar to the parameters we tweaked in Apache Worbench
    • Sampler: the HTTP Request configuration
    • Listener: Handles the requests and results and produces result metrics. 
    So, without further ado, let's create all these items:

    Thread:
    • Test Plan > Add > Threads (Users) > Thread Group

    •  Let's create 10 users, where each launches 10 simultaneous requests. 

    So, we'll have a total of 100 requests. The ramp-up period is very useful in more realistic testing scenarios and represents the interval between each thread (user) submitting requests. In this case, as we're trying to mimic the behavior from our Apache Worbench test from my previous post, I've set it to 0 (zero).

    Sampler:
    • Thread Group > Add > Sampler > HTTP Request
    • Fill the request information. Obviously the server name, port number and path may vary.

    Listener:
    • Thread Group > Add > Listener > Summary Report
    • Launch the Test
    • The Summary Reports shows basic information regarding our test.

    As you can see 100 samples were produced with an average time of 516 ms. There are LOTS of other result listeners, allowing you to show information about each request, export to CSV, graphs, etc.


    Step 2: HTTP Get Requests with dynamic parameter and measuring success


    We'll pick the previous example and send a dynamic sequential parameter, created by a JMeter counter. Then, the server will give a success or failure error message depending if the number is odd of even. So, we'll add to the existing example:

    • Counter
    • Tree Listener
    • Response Assertion

    First of all we'll have to change the asp.net mvc project.

    The action implementation will be:
    public async Task<ViewResult> Index(int id)
    {
    await Task.Delay(500);

    this.ViewBag.Id = id;
    this.ViewBag.Success = id % 2 == 0;

    return View();
    }
    And the view:
    @{
    ViewBag.Title = "Index";
    }

    <p>@(ViewBag.Success ? "Success" : "Error")</p>

    <p>Item ID:@ViewBag.Id</p>

    So, opening the page should show a different result if the parameter is odd or even:


    Regarding JMeter:

    Counter
    • Thread Group > Add > Config Element > Counter

    •  Fill the counter information. Basically it'll increment its value by one on each iteration and store the result on a variable called COUNTER.

    • Let's change our HTTP request to use this counter value. To use variables in JMeter the notation ${VARIABLE} is used. Thus, in our case, our HTTP request url should become: /Home/Index/${COUNTER}

    Tree Listener

    This is my favorite result listener during development as it shows each request, including the full response.
    • Thread Group > Add > Listener > View Results Tree

    • Rearrange the items using Drag&Drop so that they become like this:

    • Launch the Test
    Now, besides having the Summary Report as before, we can also see each request in the "View Results Tree" item. There we can confirm that each request is being sent with a different ID (from the counter) and that the response has a different message when using odd or even IDs.


    Response Assertion

    Now, sometimes we need to measure the success of a request according to the response we got. In this case, we'll consider a success if the response has the text "Success".
    • Thread Group > Add > Assertions > Response Assertion

    • Configure the assertion

    • Now run the test. Half of the requests will be considered errors (the ones with odd IDs)


    This response assertion thing is more important than you may consider at first glance. Follow my advice: always have a Response Assertion in place to make sure that your results are not tampered.

    Now, this post is starting to be a little big so I'll wrap this up on a third post where I'm going to talk about some additional things:
    • Using Variables and other misc stuff
    • Submitting HTTP POST (also, using the HTTP Proxy)
    • Handling authentication 
    • Handling the ASP.NET MVC Anti-Request forgery token
    • Loading data from a CSV file

    Load-Testing ASP.NET MVC (Part 3 - JMeter (slightly more) advanced)

    $
    0
    0
    Part 1 - Apache Workbench
    Part 2 - JMeter introduction
    Part 3 - JMeter (slightly more) advanced

    As promised, in this post I'm going to explain some more JMeter stuff. So, I'll show how to:
    • Submit information (HTTP POST)
    • Handle authentication
      • Particularly in the ASP.NET MVC context
    • Read information from a page and store it in a variable
      • Particularly to read the ASP.NET MVC anti-forgery token
    • Vary the posted data by reading it from a CSV file
    Also, I'll include some extra elements to make the test more maintainable and professional.

    So, again, lots of ground to cover so lets get started.

    First, we need to create the application that will be tested. It'll be pretty simple: a login screen and a form with a bunch of fields. After submitting it should show a success or error message according to the validation.

    So, this is the login screen:


    After supplying the correct credentials (meaning, password = "password") a page is opened with 2 fields ready to submit feedback.


    The page has validation set up

    And after filling the two fields correctly a message appears and the form fields are cleared so that new feedback may be supplied.
    That's it. Now, there's some small details to take into consideration.

    • The web page has Forms Authentication. Pretty standard stuff: if the credentials are valid then create the authentication cookie.
    • I'm using an ASP.NET MVC mechanism to defend against Cross-Site Request Forgery by supplying a token in the HTML Form that must be sent on the POST. This is done by using the ActionFilter [ValidateAntiForgeryToken] on the action and a @Html.AntiForgeryToken on the view. So, if a POST request does not include the anti-forgery token the server will reject the request and throw an exception. 
    Let's create a pseudo-representation for our test-plan:
    For each User
    |
    +--- Login
    +--- Repeat n times
    |
    +--- Submit Feedback
    +--- Wait a couple of seconds before submitting again
    This will roughly translate to:


    Now, as this is the second post on JMeter I'm going to jump some hoops and show the final test plan and then explain each of the elements.


    This might seem a little scary but most of the elements should be really easy to grasp. I'm going to show the configuration for each one:

    Test Configuration

    It's really useful to have all the configuration in one spot, typically at the start of the test. This way we can tweak stuff more easily.


    HTTP Request Defaults

    Instead of repeating the server and port on each request we can define defaults for those values. This is really a time-saver, particularly when switching environments.


    HTTP Cookie Manager

    The cookie manager is the only thing required to handle forms authentication. It makes sure that the authentication cookie is there, making your requests authorized after the login.


    For Each User

    Normal thread, but using variables instead of hardcoded numbers. The Loop Count is 1 because we have a Loop Controller inside.


    Login

    The login is a simple post to a specific action on our website. The username is always supplied as "DummyUser" with a "password" password.

    Notice that the server name and port number are empty, as we're using the HTTP request defaults.


    Open Feedback Page

    Just opening the feedback page before submitting. This is required because of the next action. 


    Regular Expression Extractor

    The Request verification token is a hidden value in the form. Something like:
    <input name="__RequestVerificationToken" type="hidden" value="........"/>

    We have to load that field into a JMeter variable. Thus we use a Regular Expression Extractor, passing the following regular expression:

    name="__RequestVerificationToken" type="hidden" value="([A-Za-z0-9+=/\-\_]+?)"


    Repeat

    Pretty self-explanatory. Repeat n times for each user (thread).


    Load data from file

    It's a good idea to have diversity on your tests. Thus, instead of having hardcoded values, we can read values from a CSV file and assign them to variables. These may then be used normally in JMeter.

    For example, I've created a csv file, named "Feedback.csv" with this content:

    Nice Site;I really enjoyed that movie
    Pretty good;I liked it, but there's some stuff that I didn't really getAwful;This is the worst piece of **** I've ever seen
    Interesting;Nice stuff
    (...)
    much more lines. Should be enough to fulfill the number of users * number of requests.

    One thing to note is the Sharing mode. With "All threads" it means that each request for each user will choose a new value from the csv file.


    Submit Feedback

    This is where the feedback itself is submitted. Notice that all the values use variables and that the Request Verification Token is also sent.


    Check Result

    Just checking if the response shows a success message or not.


    Wait Before Next Request

    If we're simulating real users, we want to wait a little bit before issuing another request. I like the Gaussian Random Timer a lot because the value is a "controlled random" as it follows a normal (Gaussian) distribution on the test-plan as a whole.


    The scary part is that JMeter provides much more stuff than what I've shown here. Anyway, I'll wrap up things for now. If you've got any doubt/suggestion place a comment.

    Custom Map Tiles (Part 5 - offline maps on iOS)

    $
    0
    0

    In this post I'm going to create an iOS mapping application, with the added benefit of using my own map tiles served offline, i.e, deployed with the application without requiring network connection.

    I'm going to use a library called MapBox-ios-sdk and the tiles will be created using TileMill and served in the .mbtiles format.


    Mapping in iOS isn't something new. There's a standard component called MapKit that's been available for some time, and there's loads of information on it all over the web. Anyway, I have two problems with it:
    • Map-Tiles are fetched over the network. Offline mapping apps are a "no-go".
    • You can't use your own map tiles.

    There's a library called Route-Me that tries to provide a similar look&feel as MapKit, but allowing a much more broader range of options for MapTiles, including offline support.

    Anyway, the hard part is choosing the "right" Route-Me. Let me explain:

    Route-Me is hosted in GitHub. Thus, if you're familiar with GitHub (or Git for that matter), it allows you to fork a specific project and work on it independently, and eventually pull some changes onto the main project (or not). Thus we have:

    • Route-Me/Route-Me 
      • Alpstein/Route-Me  (forked from Route-Me/Route-Me)
        • MapBox/MapBox-ios-sdk (forked from Alpstein/Route-Me)
    (There are much more forks. These are the most important)


    The Alpstein fork eventually changed a lot, and is now much different that the original project. In my opinion it has in-fact surpassed the master (hence the Star Wars reference).

    When I left you, I was but the learner; now *I* am the master. 
    Then, to make matters even more confusing, MapBox launched their own fork, adding some new features specific to their technology, like supporting MapBox cloud storage and the UTFGrid specification.

    Anyway,  it seems to me that MapBox-ios-sdk won't derail much from the Alpstein fork. Also, those guys from MapBox know their way around maps, so I'll stick to their fork.

    Let's get started then.

    The easiest way is, without a doubt, to download the MapBox-ios-example project. It showcases creating a map both online/offline and using UTFGrid for interaction.

    So, clone the repository in https://github.com/mapbox/mapbox-ios-example (or download it directly for that matter).

    Open the folder and run the "MapBox Example.xcodeproj" file:


    Run the project.


    Now, you have basically 3 different map modes:


    - Online Layer: Loading tiles from MapBox (which use OpenStreetMap information)


    - Offline Layer: Showing a map from an embedded resource on the project, namely a .mbtile file.


    - Interactive Layer: Showing how to interact with UTFGrid data on the maps.


    What I'll do is very simple.

    • Generate the mbtiles file.
    I'll use TileMill for this. I'll use the map that I've created for this example. It's basically a map with hexagons over Europe.


    • Copy the file to the XCode project
    Drag the file to the resources folder.


    Make sure the "Copy items into destination group's folder (if needed)" is checked


    Add the file to the bundled resources of the project.


    • Replace the map loading

    In the file: OfflineLayerViewController.m, replace the mbtiles file name from "control-room-0.2.0":


    RMMBTilesSource *offlineSource = [[RMMBTilesSourcealloc] initWithTileSetURL:[NSURLfileURLWithPath:[[NSBundlemainBundle] pathForResource:@"control-room-0.2.0"ofType:@"mbtiles"]]];

    to "HexagonsEurope":

    RMMBTilesSource *offlineSource = [[RMMBTilesSourcealloc] initWithTileSetURL:[NSURLfileURLWithPath:[[NSBundlemainBundle] pathForResource:@"HexagonsEurope"ofType:@"mbtiles"]]];


    Now let's run the sucker.

    Nice, here's our own custom map, totally offline.


    Here's a video showing the map in action, recorded directly from the emulator.


    C++ revisited

    $
    0
    0
    During my academic and professional life I've been in touch with lots of different programming languages, for example:
    Pascal, C, C++, Prolog, Java, Lisp, Javascript, C#, Smalltalk, and many others.

    With time I lost contact with most of them, except C#, Java and Javascript.

    Recently, as explained in my blog, I began to delve onto mobile game development using C++, mostly because it's a supported language in most mobile operating (iOS, Android and Windows Phone 8), and the "El Dorado" of being able to develop once and run everywhere (sort of).


    Thus, and although many years had passed, I was still able to handle most basic stuff in C++, but always missing the goodies that C# provides, and wrestling with the low-level aspect of the language. C++ was, for me, a necessary evil. Also, I was treating it as the same language that I learned 15 years ago, not acknowledging that it could have changed. How wrong I was...

    On the other day I was listening to the DotNetRocks podcast, namely show 695, where they invited Kate Gregory to talk about C++. She is an enthusiastic lady, and she talked about C++ 11 and its new features, and that it no longer is the language that people associate with manual memory management, low-level and complexity and that it's still one of the most widely used computer languages today. Also, lots of libraries have appeared (like boost) that deal with lots of heavy-lifting for the developer (for example, smart-pointers).


    literally add some "wow" moments while I realized that many of the things that I thought I knew where wrong. It got me terribly interested in learning some more so I subscribed PluralSight and am currently watching all the C++ tutorials (also by Kate Gregory) from the basics.

    It's being an eye-opener for me. Also, C++ is a first class citizen in Windows 8, and it'll be able to take advantage of most of the IDE richness that C# has had over the years, like designer support for XAML. I believe this is a good time to (re)learn C++ and use it, for instance, in Windows 8 Metro design.

    Regarding changes in C++ 11, I'll just borrow this blog post which explains everything brilliantly:
    http://blog.smartbear.com/software-quality/bid/167271/The-Biggest-Changes-in-C-11-and-Why-You-Should-Care.


    Things like lambda expressions, auto-types (the var in c#), asynchronous stuff, smart-pointers (and much more) are all there. Great stuff.

    I'm not ready to dismiss C# as my favorite language but I'm certainly interested in adding C++ to my programmer's "bag of tricks" :)


    Freehand drawing with Cocos2d-x and Box2d

    $
    0
    0
    After going on holidays and recharging my batteries I'm ready for some more blogging action.

    This will be a fun one. Basically I want to:
    • Allow the user to draw a freehand shape on the screen
    • After releasing the click/gesture the shape should materialize itself into a dynamic physics body.
    • The generated bodies should be affected by gravity and will collide with each other
    I'll be using cocos2d-x 2.0.1 with Box2D for the physics.

    (Update: 24 March 2013: As some people were having trouble making it work I've replaced the current download with a complete XCode project using the latest Cocos2d-x version (cocos2d-x 2.1.2))

    Anyway, a video is worth more than 10.000 words (heck, if a picture is worth 1000 words a video is certainly more). Here's the final effect:


    There are a lot of challenges to address here so let's get started. I'll use the default "Cocos2d-x with box2d" template as a starting point.


    Step 1. Remove unwanted code.

    We'll just use the HelloWorld class, and thus remove the "addNewSpriteAtPosition" method, and change the touch event so that nothing happens... yet :)

    Step 2. Freehand drawing on the screen:

    The idea is as follows:
    1. Create the concept of a brush
    2. Also, create the concept of a full-screen canvas
    3. When touching/clicking the screen, paint the canvas with that brush.
    Now, let's map this to Cocos2d-x concepts:
    1. The brush will be a CCSprite
    2. The canvas will be a CCRenderTexture
    3. To paint a CCSprite (or any other CCNode for that mater) onto a CCRenderTexture you call the Visit method of the sprite during the gesture/cursor movement.
    Here's the image sprite used for the brush

    Source-code:
    Inside the constructor:
        target = CCRenderTexture::create(s.width, s.height, 
    kCCTexture2DPixelFormat_RGBA8888);
    target->retain();
    target->setPosition(ccp(s.width / 2, s.height / 2));

    this->addChild(target);

    brush = CCSprite::create("largeBrush.png");
    brush->retain();

    The "brush" and "target" are declared as:
    cocos2d::CCRenderTexture *target;
    cocos2d::CCSprite *brush;

    Then add the ccTouchesMoved method with this implementation.
    void HelloWorld::ccTouchesMoved(CCSet* touches, CCEvent* event)
    {
    CCTouch *touch = (CCTouch *)touches->anyObject();
    CCPoint start = touch->locationInView();
    start = CCDirector::sharedDirector()->convertToGL(start);
    CCPoint end = touch->previousLocationInView();
    end = CCDirector::sharedDirector()->convertToGL(end);

    target->begin();

    float distance = ccpDistance(start, end);

    for (int i = 0; i < distance; i++)
    {
    float difx = end.x - start.x;
    float dify = end.y - start.y;
    float delta = (float)i / distance;
    brush->setPosition(
    ccp(start.x + (difx * delta), start.y + (dify * delta)));

    brush->visit();
    }

    target->end();
    }

    The for cicle is used to make the line continuous. Otherwise, if the cursor moved too fast, there would be gaps in the line.

    Here's the end-result while drawing.


    Nice.

    Step 3. Create a static physic object matching the drawing

    Our matching physics object will be composed of several rectangles. Each rectangle will be a fixture of the body with constant height, based on the brush image size. This will make the physics object and drawing match as closely as possible.

    Let's begin by creating an helper method to add a rectangle to a box2d body.
    void HelloWorld::addRectangleBetweenPointsToBody(b2Body *body, CCPoint start, CCPoint end)
    {
    float distance = sqrt( pow(end.x - start.x, 2) + pow(end.y - start.y, 2));

    float sx=start.x;
    float sy=start.y;
    float ex=end.x;
    float ey=end.y;
    float dist_x=sx-ex;
    float dist_y=sy-ey;
    float angle= atan2(dist_y,dist_x);

    float px= (sx+ex)/2/PTM_RATIO - body->GetPosition().x;
    float py = (sy+ey)/2/PTM_RATIO - body->GetPosition().y;

    float width = abs(distance)/PTM_RATIO;
    float height = _brush.boundinbog.size.height /PTM_RATIO;

    b2PolygonShape boxShape;
    boxShape.SetAsBox(width / 2, height / 2, b2Vec2(px,py),angle);

    b2FixtureDef boxFixtureDef;
    boxFixtureDef.shape = &boxShape;
    boxFixtureDef.density = 5;

    body->CreateFixture(&boxFixtureDef);
    }

    The physics boxes are created simultaneously with the drawing. The following image shows the physic bodies composed of small rectangles (I've hidden the yellow drawing).


    Step 4. Convert the static physic objects into dynamic objects

    We already have physic objects, but they're static. I want them to materialize into dynamic objects when releasing the click/gesture so that they're affected by gravity. After implementing this behavior we get this.


    I've drawn the Hello word. After releasing the gesture the physics objects tumble down but the drawing remains static. We're just missing the final piece of the puzzle.

    Step 5. Make the sprites match the physics object while moving/rotating

    Here comes the hard part: make the sprite match the box2d object and keep them matched while the physics object moves and rotates.

    The idea is simple:
    • Iterate the box2d body fixtures to get the top-left and bottom-right corners coordinates.
    • Take a rectangular snapshot of the CCRenderTexture (using the above coordinates) to create a new sprite. 
    • Associate the sprite with the physics body.
    • Then, and this is essential, change the sprite anchor point to match the box2d body starting point.
    Afterwards everything should work like in the video (except the color and radius of the brush, which I changed).


    I'm also including the source-code (updated on 24/03/2013) for this example. Don't mind the quality of the code as it has some duplication and is not exactly polished. Anyway, feel free to use it.

    You can get a zip file here

    OpenStreetMaps

    $
    0
    0
    I haven't blogged yet specifically about OpenStreetMaps (OSM). On this post I'm going to talk a little bit about OSM and the easiness and importance of adding information.

    For those that haven't heard about OSM the simplest explanation is: it's the Wikipedia for maps. A joint collaborative effort of thousands of people to create a free world map.

    Recently OSM has gained a lot of traction, mostly because of the transition of some key players from other mapping technologies/data to OSM. Notable examples:
    • Foursquare
    • Apple
    • Wikipedia
    • Craigs List
    I'm really glad that OSM is finally getting the exposure that it deserves, but I still feel that it's a niche thing. Everyone that likes maps obviously knows it, but it isn't as entrenched on our web culture as something like Wikipedia, and most people don't realize that there's a free mapping wiki where everyone can contribute with unique and valuable information.


    I even thought about creating an initiative to promote OSM in Portugal called "Let's put Portugal on the map". Basically it would be the "formalization" of me preaching to people about the easiness and simplicity of adding information in OSM.

    I typically use my neighborhood as an example (although there are much better examples). This was my neighborhood according to OSM:


    The map was kind of lacking, so I edited it. This is my neighborhood now according to OSM:


    I fixed/added roads, buildings, ATM machines, pharmacies, coffee-shops, gardens, parking-lots, etc. The panoply of information one can place on OSM is staggering.

    Regarding editing, and although there are very, very powerful tools to edit OSM data, the OSM webpage provides a really nice editor itself. Thus, to access the edit mode it you just have to click "Edit" on the top-left corner of the map.


    The edit page has something that is, in my opinion, the game-changer: a photographic overlay from Bing.


    We can, like in a drawing application, create the roads and buildings on top of the photograph. It's that easy.

    Let me show you an example. I just panned the map a little bit and found this area:


    I've timed this edit. It took me less than 2 minutes to fix the map.


    Just to say this: OSM is freaking awesome. I just wish more people could understand its full reach and start to contribute.
    The funny thing is that it's really easy to engage someone on this. You just go: "Lets check if your area is well mapped". They'll probably rant saying that something is wrong, or some road is missing and you just go: "Well, just fix it then" :)

    Going the micro-ORM way with Dapper

    $
    0
    0
    If you're a developer you've most certainly used stackoverflow (or any other of the stackexchange sites). It's the reference Q&A site out there and has got tons of helpful content and a really enthusiastic community.

    One of my favorite things about Stackoverflow is that it's damn fast. The interface, although minimalistic, shows lots of information, refreshes everything on-the-fly and just feels snappy. It's public knowledge that Stackoverflow developers are obsessed with performance, and fortunately they've been more than happy to share their secrets with the community through some blog posts and videos.

    To achieve the results you see today they've used many clever tricks and tweaks, but have also developed some in-house tools to overcome the performance limitations of existing technologies. In this post I'm going to look at their own ORM: Dapper, which is widely used in Stackoverflow and has been open-sourced on Github (link).

    First of all, Dapper is specifically a micro-ORM. You can't just compare it with NHibernate or Entity Framework because all that it does is materialize your POCOs from your manual queries results.

    It's used mainly like this:
    using (var connection = new SqlConnection(connectionString))
    {
    connection.Open();
    List<Person> persons = connection.Query<Person>("select ID,Name from Person");
    }

    You might argue: "Manual Sql strings? That's so 20th century. Where's my LINQ?". Yeah, it's true, but remember, this is built for performance and simplicity. If you want a little bit more background and motivation on the "why" check Sam Saffron blog post where he describes why and how Dapper was developed.

    Demo

    Anyway, let's create a demo from scratch.
    • I'll assume there's a database with a table named "Person" with the following columns:
      • ID: int identity
      • Name: varchar(255)
      • Age: int
    I've also added 10 persons to the database:

    • Now lets create a C# console application in Visual Studio 2010/2012
    • Dapper has been packaged on NuGet for our convenience, so just add it to your project.


    • Let's start coding:
    using System.Collections.Generic;
    using System.Data.SqlClient;
    using Dapper;

    namespace DapperTest
    {
    class Program
    {
    static void Main(string[] args)
    {
    using (var conn = new SqlConnection("<connection string>"))
    {
    conn.Open();
    var persons = conn.Query<Person>("select * from person");
    }
    }
    }
    }
    Simple stuff. Create a connection and fetch all the Persons in the database. If you place a breakpoint after the query you can see that it correctly fetches all the persons with their data.


    You can also pass parameters using anonymous objects. For example, to just get people with age > 35.
    var persons = conn.Query<Person>("select * from person where Age > @age",
    new { age = 35 });


    What about Inserts, Updates? Well, we've got to go old school on this, sending: "insert into/update" sql commands to the database. Something like:
    connection.Execute(@"insert into Person(Name, Age) values (@name, @age)", 
    new{ name="John Smith", age=20 });
    Not very compelling... but at least is fast.

    I'm not going to delve on all the features of Dapper, as the main page of Dapper does a good job at that, but it's basically some simple variants of what I've shown above:
    • Executing commands
    • Sending multiple commands to the database
    • Dynamic data 
    • (etc)

    Personal oppinion

    Dapper is really simple and easy to grasp, but I'm not that fond of having explicit SQL laying around and not taking advantage of the LINQ goodness and all the stuff that NHibernate/Entity Framework provides.

    I guess one can follow the approach Stackoverflow uses: they've started out using Linq-to-SQL, and fine-tune to Dapper as needed. The advantage of using POCOs is that they're ORM agnostic, and you can use them in your business logic, whatever the ORM that materialized it.

    I'm not really sold on this concept yet, because experience has shown me that typically the performance bottlenecks with big ORMs are related to the database itself (badly designed schema, incorrect indexing strategy, etc) or with the incorrect usage of the ORM (not understanding lazzy loading, the N+1 problem, not using a profiler to check the generated queries, etc). The ORM "bloat" is typically not the main issue.

    A "better" Dapper

    I like the simplicity of Dapper but miss some of the help you get from a more complete ORM. For example, to do updates/inserts.

    Sam Saffron wrote a blog post talking about this "problem" and here's what he says about it:

    "In the past I “sold” Dapper as a minimal ultra fast data mapper. In retrospect the message I sent was lacking. Dapper is piece of Lego you can build other ORMs with."

    This makes sense, and one can confirm this is true just by checking some NuGet packages like:
    • Dapper.Contrib
    • Dapper.Extensions

    Both give you additional methods like the following:
    connection.Insert<Person>(new Person { Name="John Smith", Age = 20});
    or
    connection.Update<Person>(new Person { ID=6, Name="John Smith", Age = 20});

    Dapper.Extensions provides some additional goodness. Its full feature set is:
    • Automatic mapping of POCOs for Get, Insert, Update, and Delete operations.
    • GetList, Count methods for more advanced scenarios.
    • GetPage for returning paged result sets.
    • Automatic support for Guid and Integer primary keys (Includes manual support for other key types).
    • Pure POCOs through use of ClassMapper (Attribute Free!).
    • Customized entity-table mapping through the use of ClassMapper.
    • Composite Primary Key support.
    • Singular and Pluralized table name support (Singular by default).
    • Easy-to-use Predicate System for more advanced scenarios.

    Not bad at all. Lets try it:

    • Add the NuGet package called "DapperExtensions"
    • Modify the source-code
    using System.Collections.Generic;
    using System.Data.SqlClient;
    using Dapper;
    using DapperExtensions;
    using DapperTest.Properties;
    using System.Linq;

    namespace DapperTest
    {
    class Program
    {
    static void Main(string[] args)
    {
    using (SqlConnection conn = new SqlConnection("<conn string>"))
    {
    conn.Open();

    int countBeforeInsert = conn.Count<Person>(null);

    conn.Insert<Person>(new Person { Age = 33, Name = "John Smith"});
    conn.Insert<Person>(new Person { Age = 64, Name = "Mary Kole" });

    int countAfterInsert = conn.Count<Person>(null);

    IList<Person> persons = conn.GetList<Person>(
    Predicates.Field<Person>(f => f.Age, Operator.Gt, 35))
    .ToList();
    }
    }
    }
    }
    Here we're using some specific DapperExtensions methods like the "Count", "Insert" and "GetList" (which supports a basic predicate system). The result of this execution is:


    There were 10 persons on the database (countBeforeInsert). 2 extra persons were inserted, thus 12 in the database (countAfterInsert). There are now 6 persons with ages above 35, the first 5 from the original data and the new one that was inserted (64 year-old Mary Kole).

    Conclusion

    Well, this ends my post on Dapper, the micro-ORM used at Stackoverflow. It's simple, fast and doesn't do too much magic for you.

    Just to wrap up, I would like to mention two other great Micro-ORM libraries: Massive and PetaPoco. Although their usage is a little bit different the principle remains the same.


    NHibernate Spatial (Part 5 - NHibernate 3.3.1+)

    $
    0
    0

    NHibernate Spatial is sort-of moribund, which is rather unfortunate because it's a really great project with lots of potential. Anyway, not conformed with it I decided to put the sucker onto Github to create an unofficial working version of it.

    Fortunately some lads had the same idea avoiding me the extra-work. Unfortunately their projects don't have that much activity and most don't seem to really work. Anyway, in the spirit of GitHub and collaboration I decided to fork one of these to try my luck. Also, if time permits, I'll try to maintain it for future NHibernate releases.

    I've forked the following project: https://github.com/suryapratap/Nhibernate.Spatial. The author already set it up nicely, making the following changes to the broken nhcontrib version:
    • Fixed compilation errors
    • Used NuGet for some references
    • Upgraded the projects from VS2008 to VS2010
    So, props for suryapratap for providing a much nicer starting point. My own fork is at: https://github.com/pmcxs/Nhibernate.Spatial where I'm going to update this library.

    I've started by:
    • Fixing some references. Some were directed to the "lib" folder, which no longer exists. I've directed the missing references to NuGet versions, except the "NetTopologySuite.TestRunner" stuff, which I included as a project (downloaded from NTS homepage).
    • Renaming the projects, removing the Visual Studio version sufix
    • Beginning to fix the Oracle version (still doesn't compile, and for now is removed from the main solution)
    • Updating some code/configuration to reflect newer NHibernate versions, like removing "NHibernate.ByteCode.Castle" from the equation, as NHibernate (since 3.2) now includes its own embedded proxy generator.
    • Try to get it working :)
    So, now I'm going to run the unit-tests (for Sql 2008) to see how it fares. Thus I need to:
    • Create an empty database named nhsp_test -> check
    • Fix the connection strings in the test projects -> check
    • Run NUnit -> check

    Well, I was actually surprised that it ran correctly at first try. Anyway, lots of errors and fails. Some are specific to Sql 2008, mainly because the NHibernate Spatial incorrectly thinks that SQL Server 2008 uses spatial metadata columns (like PostGis does). A quick fix on MsSql2008SpatialDialect.cs and now some of the tests are automatically ignored for Sql Server 2008.


    Also, some tests simply can't be used for both Sql Server 2008 and other Databases. For example, there is a test that asserts that the following polygons as invalid:
    Shell self-touches at vertex
    Shell self-touches at non-vertex

    The "problem" is that Sql Server 2008/2012 handles these polygons without any fuss. So, because of these and other differences I've created special overrides for the tests that behave differently in Sql Server. I've also removed some incorrect tests that seemed like experiments that were committed by mistake.

    Running NUnit now gives this result:


    Three tests are failing, but this represents indeed a bug in NHibernate.Spatial. I'm pretty sure this test passed prior to NHibernate version 3.2, so I guess some internals in NH were modified, causing the issue.

    Basically the query is issued to Sql Server like this:
    SELECT this_.oid as oid0_0_, this_.name as name0_0_, this_.the_geom as the3_0_0_ FROM linestringtest this_ WHERE this_.the_geom.Filter(@p0) = 1 
    But the @p0 parameter is not passed.

    I've added the NHibernate project to the solution to step into the implementation and try to understand the problem. After lots of debugging I finally found the code where the problem resides:

    Inside the "NHibernate.Param.ParametersBackTrackExtensions" class, the method "GetEffectiveParameterLocations" was not able to backtrack the properties:
    public static IEnumerable<int> GetEffectiveParameterLocations(
    this IList<Parameter> sqlParameters, string backTrackId)
    {
    for (int i = 0; i < sqlParameters.Count; i++)
    {
    if (backTrackId.Equals(sqlParameters[i].BackTrack))
    {
    yield return i; // ---> NEVER RETURNED ANY VALUE HERE
    }
    }
    }
    After a while I was finally able to fix this bug. I'm putting it all up on my Github fork at: https://github.com/pmcxs/Nhibernate.Spatial

    Running the tests now shows no errors:


    Now that I've got the project set up on Github this should be my last post regarding NHibernate Spatial on this blog. There's obviously a lot to be said, but I'll use the Github project wiki for that.

    Anyway, this project is still far from complete. Although I've fixed a few bugs, some features were never implemented in the official project, and still throw a "NotImplementedException". I'm planning on implementing them and having an up-to-date wiki page that shows the working/non-working feature set of the library. The page is already setup but the content is not yet updated:
    https://github.com/pmcxs/Nhibernate.Spatial/wiki/Feature-Matrix

    I'll also try to keep the issues and wiki pages updated as much as possible.
      I'm including binaries downloads for each NHibernate version. Currently I just have for NHibernate 3.3.1.4000, but I'll update this as new versions get released.

      I'll also add a whole new set of unit-tests to the solution. They'll be separated by spatial operation type (aggregation, analysis, relation, validation) and will include versions for each query API (Criteria, HQL, LINQ, QueryOver). Obviously some tests will be redundant with existing ones, but in this case more is better.


      Zoomable image with Leaflet

      $
      0
      0
      Last week the European Southern Observatory (ESO) published a 9 giga-pixel image cataloging 84 million stars in the Central parts of the Milky Way. They even provided this image in a zoomable format at http://www.eso.org/public/images/eso1242a/zoomable/ .

      It's really cool, but I'm not particularly fond of the Flash Plugin that they've used. It's a little bit slugish, and IMHO something like Google/Bing/Leaflet could provide a much better user experience.

      That said, here's what I'll do: I'll get a smaller image from ESO, split it in tile images and display it on Leaflet.

      To split the image I'm going to use an utility called GDAL2Tiles. I'll show two variants of this:
      • using the command-line tool
      • using a Graphical Interface called MapTiler
      If you just want to keep things simple jump right ahead to the MapTiler version. I'm also showing the command-line version because it's more productive and suitable to batching scenarios.


      I've obtained the image here. According to the description this is a "VST image of the star-forming region Messier 17".

      1.a) Using GDAL2Tiles

      Requirements:
      • Install Python2.7 (installer here)
      • Install GDAL-core (unofficial installer here
      • Install GDAL-Python bindings (unofficial installer here)
      Now, when running the GDAL command line, you have access to gdal2tiles.py.

      You can check the help at the official page here.

      Basically this is it.
      gdal2tiles.py [-p profile] [-r resampling] [-s srs] [-z zoom]
      [-e] [-a nodata] [-v] [-h] [-k] [-n] [-u url]
      [-w webviewer] [-t title] [-c copyright]
      [-g googlekey] [-b bingkey] input_file [output_dir]
      As you might suspect by the arguments, this utility is also able to automatically create a web viewer for the created tiles. In our case, as we want to do things manually and use Leaflet, we won't generate the viewers (hence, parameter 'w' will have the 'none' value).

      Regarding the other parameters:
      • profile: the default is "mercator". In our case the image is not georeferenced, so the value should be "raster"
      • resampling: will use the default value "average"
      • SRS: Our image doesn't have any SRS, so no value here
      • resume mode ('e'): No, so don't use parameter 
      • Zoom level. See below:
      The "zoom level" parameter is relatively easy to grasp:

      On a Leaflet map (or Google/Bing), the furthest way zoom level (whole world on a single tile) is 0 (zero). This corresponds to a 256x256 square image. With each zoom level the square size is multiplied by 2, thus:
      • Zoom level 0: 256 px
      • Zoom level 1: 512 px
      • Zoom level 2: 1024 px
      • Zoom level 3: 2048 px
      • Zoom level 4: 4096 px
      • Zoom level 5: 8192 px
      • Zoom level 6: 16384 px
      (and so on)

      So, in my case the image is 16017x16017, so which zoom level to choose? Well, we can choose a max of 6, but this will make the map have 367 pixels of empty white space (16384-16017). So, we have three options here:
      1. Embrace the white bands and do nothing
      2. Resize the image so that it matches precisely a power of 2 (256, 512, ..., 16384)
      3. Convert it to a GeoTIFF file (which is georeferenced), where the corners match the world map corner coordinates.
      For now I'll go for option 2, using another tool from GDAL to resize the image. So, to resize it to 16384 and keep it as a JPEG file I've used the following command:
      gdal_translate -of JPEG -out size 16384 16384 eso1119a.jpg eso.jpg

      meaning:
      gdal_translate -of JPEG -out size «target witdth» «target height» «source file» «target file»

      Now we're ready to run the GDAL2Tiles:
      gdal2tiles.py -p raster -z 0-6 -w none eso.jpg

      Just as simple as that. Wait a couple of minutes and you should have a folder with the following structure:
      eso / «z» / «x» / «y».jpg


      1.b) Using MapTiler

      MapTiler has no requirements. Just download, run the installer and you're set to go.

      I'll assume though that the input image is the one that was resized on the previous steps (eso.jpg).


      You may notice that these settings map almost one-to-one to the GDAL2Tiles command-line version.

      Anyway it has got everything inside the same package so you don't need to install Python and GDAL.

      2) Using the tiles in Leaflet

      Now for the really easy part, create the following html page:
      <html>
      <head>
      <link rel="stylesheet"
      href="http://cdn.leafletjs.com/leaflet-0.4/leaflet.css" />
      </head>
      <body>
      <div id="map" style="width: 700px; height: 500px"></div>

      <script src="http://cdn.leafletjs.com/leaflet-0.4/leaflet.js"></script>

      <script>
      var map = L.map('map').setView([0, 0], 2);
      L.tileLayer('eso/{z}/{x}/{y}.jpg', {
      minZoom: 1,
      maxZoom: 6,
      attribution: 'ESO/INAF-VST/OmegaCAM',
      tms: true
      }).addTo(map);
      </script>
      </body>
      </html>

      It's very important to set the "tms" parameter to "true". In previous Leaflet versions this was set with the "scheme" parameter.

      3) End-Result

      Check the web-page here.


      Viewing all 63 articles
      Browse latest View live